Here’s how to restore your lost call history on Android — connect your phone to your computer using a USB cord. After that, allow USB debugging on your phone then select only your Call Log for data recovery. Following this, start the scan to find your phone’s deleted call history.
Have you ever accidentally deleted your call history or a number from your call log when you were trying to save it? If you have, I understand your struggle. Luckily, you can recover your lost call history, and it’s fairly easy too.
Here’s how to recover deleted call log on Android — these tricks have saved me more times than I can count.
Contents
Recovering A Deleted Call Log On Android
I’ve used three different methods to recover my deleted call logs, they are Phone Rescue, Dr. Fone, and Samsung Cloud. They are all easy to use and pretty straightforward.
Dr. Fone (read our review) and Phone Rescue allow you to recover your deleted call history on any Android device, while Samsung Cloud only works with select Samsung phones. Besides device limitations, Dr. Fone and Phone Rescue came at a cost, while Samsung Cloud is free.
If you’ve got a Samsung device, and you’re looking for a $0 solution, Samsung Cloud may be for you. However, if you’re not a Samsung user then Dr. Fone and Phone Rescue have you covered.
Using Phone Rescue
Phone Rescue is a data recovery tool that you can use to restore lost data for both iOS and Android devices. It’s fairly simple to use and a great way to recover call logs from Android devices.
It works for both rooted and non-rooted Android devices; however, to recover your deleted call history, your phone needs to be rooted. If your phone isn’t rooted, and you’re open to rooting it, Phone Rescue can do it for you.
It will take you about 5 minutes
Here’s how to recover lost call history on Android using Phone Rescue.
- Open the Phone Rescue software and connect your Android device.

- Wait until Phone Rescue presents you the different types of data that it can recover.
Once you’ve connected your device to your computer, Phone Rescue will install the app on your Android device and then launch it on your device. Once the device installation is complete, you’ll see the Phone Rescue software on your desktop display the different types of data that it can recover on your device.

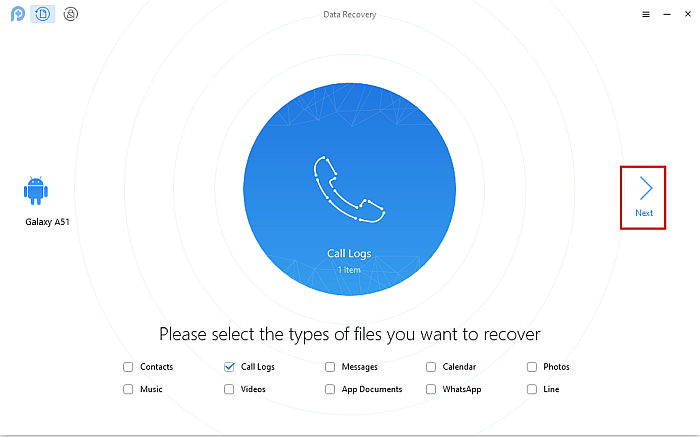
- Uncheck every option except for the “Call Logs” and click “Next”.
Phone Rescue automatically selects every data category, but since you only need the call log, uncheck every option except for the “Call Logs,” then click “Next” to recover your phone’s deleted call history.
- Allow Phone Rescue to access your device and click “ok” on your PC to begin the scan.
After you’ve done the previous step, Phone Rescue will ask for permission to access the different folders on your device. You need to allow it access to your phone, then click “ok” on your PC to begin the scan.

- If your Android is rooted, skip this step; if not, choose “Deep Scan” or “Quick Scan.”
As I mentioned before, your Android device needs to be rooted for Phone Rescue to recover its deleted call history.
If you’ve rooted your Android device before, skip this step.
If it isn’t rooted, you’ll get a warning like the one below, which shows you the difference between a “Deep Scan” and a “Quick Scan.”
A “Deep Scan” will recover as much of your deleted call history as possible, while a “Quick Scan” will only show what’s already available on the device. If you want to root your phone, Phone Rescue will do it without any additional charge.
- After you’ve made your choice, Phone Rescue will begin scanning your device.

- Once the scan is complete, your device’s call history will be displayed. Phone Rescue also allows you to save your call history to your computer for your records/future viewing.
Phone Rescue also allows you to save your call history to your computer for your records/future viewing.

Here’s a video tutorial showing you how to recover deleted call logs with Phone Rescue:
And Phone Rescue doesn’t just restore call logs, it’s great for overall data management and Android data recovery. Check out our detailed Phone Rescue Review to learn more. You can download Phone Rescue here to restore your Android phone’s data.
Using Dr. Fone
Dr. Fone is a data management software for iOS and Android devices. You can also use it to recover lost data, such as media files, messages, and in this case, recovering your deleted call history on an Android device.
The Dr. Fone software works with both rooted and non-rooted Android devices, however, to recover deleted call history, your device needs to be rooted for Dr. Fone to work.
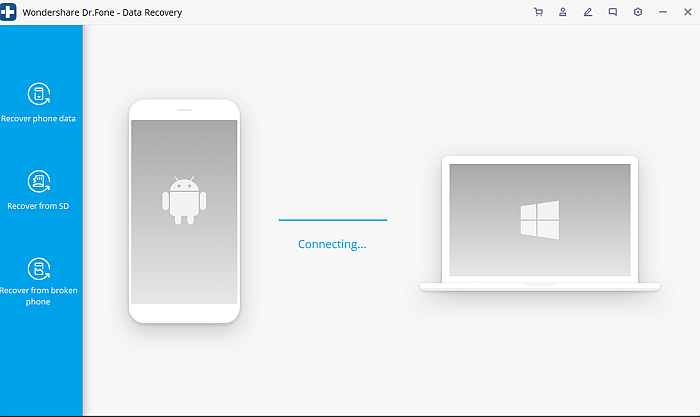
- Open the Dr. Fone software on your PC and then connect your Android phone to your computer. It will automatically detect your Android device.
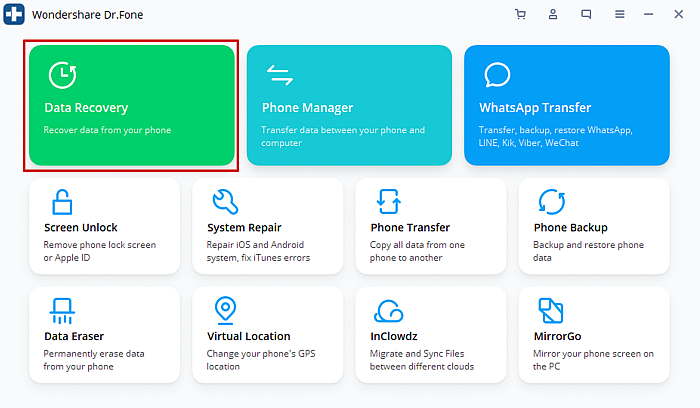
- Once you have connected your Android device and Dr. Fone has recognized your phone, select the Data Recovery option.
If you don’t have USB Debugging enabled, you will need to turn it on before you continue. Dr. Fone will show you how through a mini-tutorial. - After you’ve selected the Data Recovery option, Dr. Fone will show all the categories of data selected that you can recover. Uncheck everything except “Call History,” then click next.

- Dr. Fone will then scan your device for its call history. Once it has scanned your device and recovered your call history, it will display it for you to see.

- You can restore the deleted call history to your phone or save it on your computer for future viewing/reference.

If you’re looking for a video tutorial, here’s a great one on how to use Dr. Fone to recover deleted call history on Android:

Download Dr. Fone and recover your lost call history.
Using Samsung Cloud
Similar to Apple’s iCloud, Samsung Cloud is a cloud storage service available to Samsung users. You can use Samsung Cloud to easily back up and restore data on your Samsung devices. In this instance, you’ll be using it to restore call history.
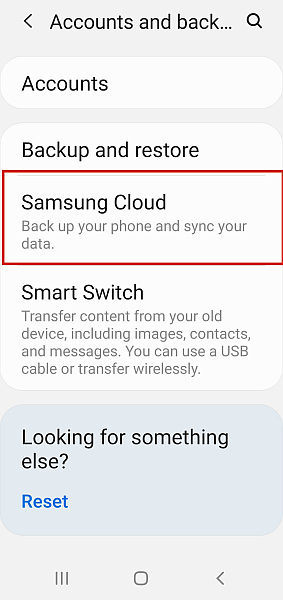
- Open Samsung Cloud on your Samsung device, you can do this by going into Settings > Accounts and Backup > Samsung Cloud.
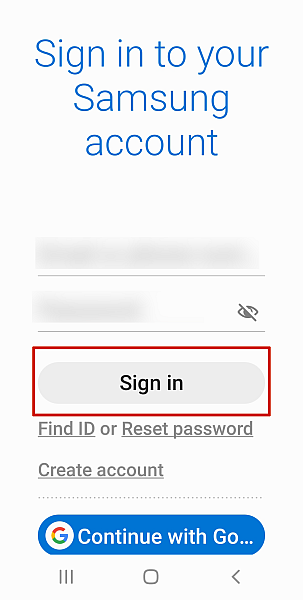
- Once you’ve opened Samsung Cloud, log into your Samsung Cloud account if you aren’t already logged in.
- After you’ve logged in, you’ll see the Samsung Cloud interface that’ll provide you with three options “Back up Data, “Restore Data,” or “Delete Back up.” Select the “Restore Data” option.

- The next page will show you which data you can restore. They’re all automatically selected, so deselect everything except “Call logs.”

- Once you’ve done this, click “Restore” at the bottom of the page to restore your call history from your last backup.

- After your call log has been stored, tap “Done” to finalize the process. You can review your restored call history where you view your regular call log.

You can also watch this video on how to back up and restore data using Samsung Cloud:

FAQs
Can I recover deleted call history?
Deleted call history is recoverable using several methods. One of which is using Samsung Cloud to restore your backup to your phone, where you can view its deleted call history. Dr. Fone also works to recover deleted call logs to your phone, and you can save them to your PC.
Can you get back deleted phone calls?
You can get back deleted phone calls using recovery software such as Phone Rescue. It will perform a deep scan of your phone and recover the deleted phone calls. However, it’s important to note that your phone needs to be rooted for a deep scan to take place.
Can I get call history of any number?
Accessing the call history of any number is possible through several methods. One of the best ways to do this is by using a spy app, such as mSpy.
How To Recover Deleted Call Log On Android — Wrapping Up
I hope you enjoyed this article. Call log recovery is important because sometimes it’s the only way you can get a number you forgot to save or show proof of contact.
Another problem I’ve had is that call logs can only go so far back before Android automatically deletes them. If you find this to be an issue as well, you can learn how to get an unlimited call log on Android.
All three methods I mentioned work great. Samsung Cloud is a free option if you have a compatible Samsung device, however, if you don’t, Dr. Fone and Phone Rescue both work well with other Android devices.
Need to also recover some lost screenshots? Our tutorial will help you to do just that!
Thanks for reading and be sure to comment below with what you thought about this article and share it with your friends too.