There are three easy ways to recover Android data after a factory reset. One, you can restore from a local backup. Two, you can restore from your Google Account. And lastly, you can use a third-party app, like Dr. Fone.
Data is one of the most important assets today, as it contains practically everything you need to function in the modern world. For most people, protecting their data is not just a suggestion, but a requirement.
But sometimes, things happen out of our control. Maybe your data was compromised or maybe you downloaded a sketchy application from the internet and now you have to do a full factory reset on your phone.
Whatever the reason, don’t worry – you can still recover your precious data.
In this article, we’ll teach you how to do Android data recovery after factory reset!
Contents
3 Ways To Do Android Data Recovery After Factory Reset
A factory reset may seem absolute – and usually, it is. That’s because a factory reset erases all user information, effectively resetting the phone back to how it was fresh from the factory.
That said, there are several measures you can take to completely recover all your important data, even after a factory reset.
From A Local Backup

Many Android smartphones already come with a built-in backup service that gives you the ability to back up some of your data to your phone or to an external SD card. If you have such a feature, using a local backup is one of the most convenient ways to recover your lost data after a factory reset.
However, this option comes with a few caveats. You have to be careful of where you’re saving your backup. In the event of a factory reset, every user-generated data in your phone’s internal storage is going to be erased.
Thus, always save your backup on an external SD card. You can also create backups using a third-party app, like Coolmuster Android Assistant, to make things easier.
In addition to this, keep mind that not everything will be backed up. Often, the only data that can be backed up are contacts, messages, call history, system data (such as setting preferences, weather, home screen, clock, and contact blacklist/whitelists), and applications that are compatible with the service.
A local backup will not include photos or music that you have saved on your phone’s internal memory.
With this out of the way, you can follow the steps below to restore a local backup in the event of a factory reset. Take note that this tutorial was done on a Xiaomi phone, so the exact steps may vary depending on your phone’s brand.
- Make sure that the backup file is saved on an SD card that is plugged into the Android device where you will restore the data.
- Go to your phone’s settings.
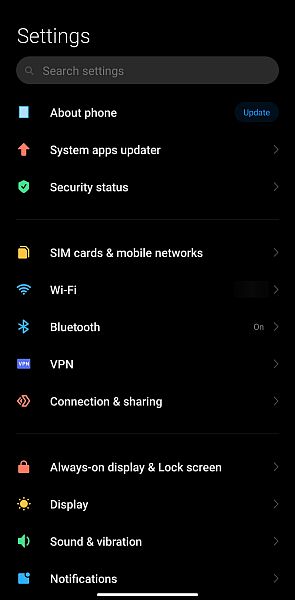
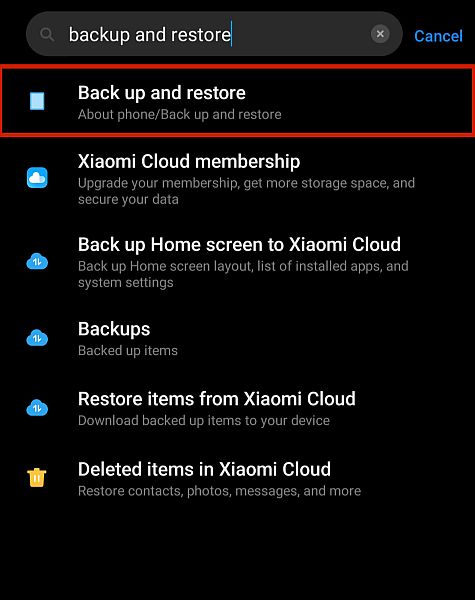
- Look for the Backup and Restore option. The easiest way to do this is to simply type “Backup and Restore” in the search bar. If you still can’t find Backup after this, your Android phone might not have a local backup option.
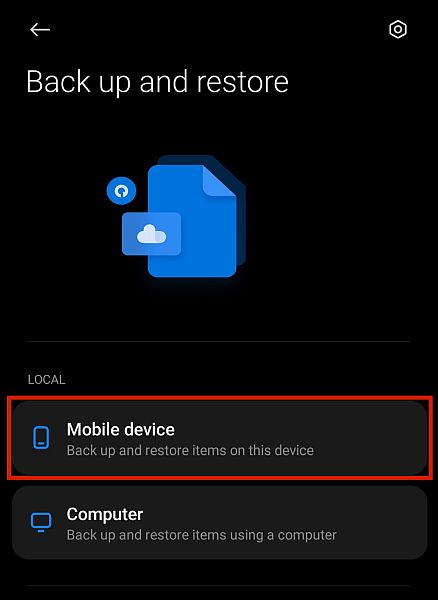
- Under the Local tab, click Mobile Device, or something similar, depending on your phone brand.
- Go to the Restore tab. Your phone will then show a list of backup files that it can restore. If it doesn’t find any, you’ll have to manually search your SD card files to find where your local backup was saved.
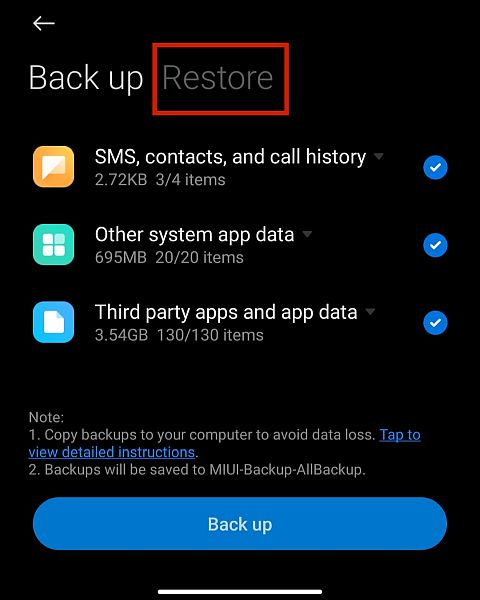
- Tap the backup file you want to restore.
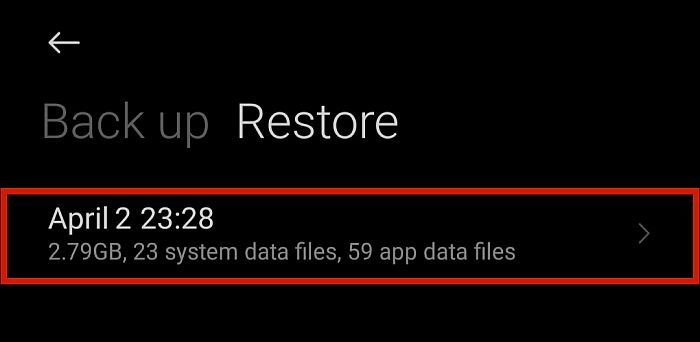
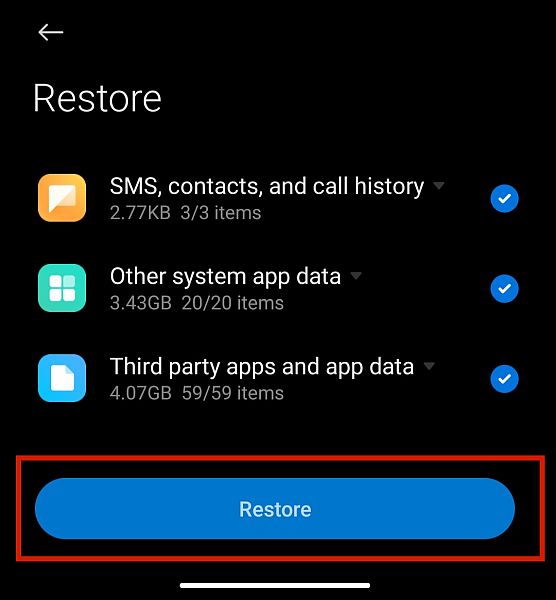
- Select your options and click Restore. Once that’s done, you should have all the data that you’ve previously saved.
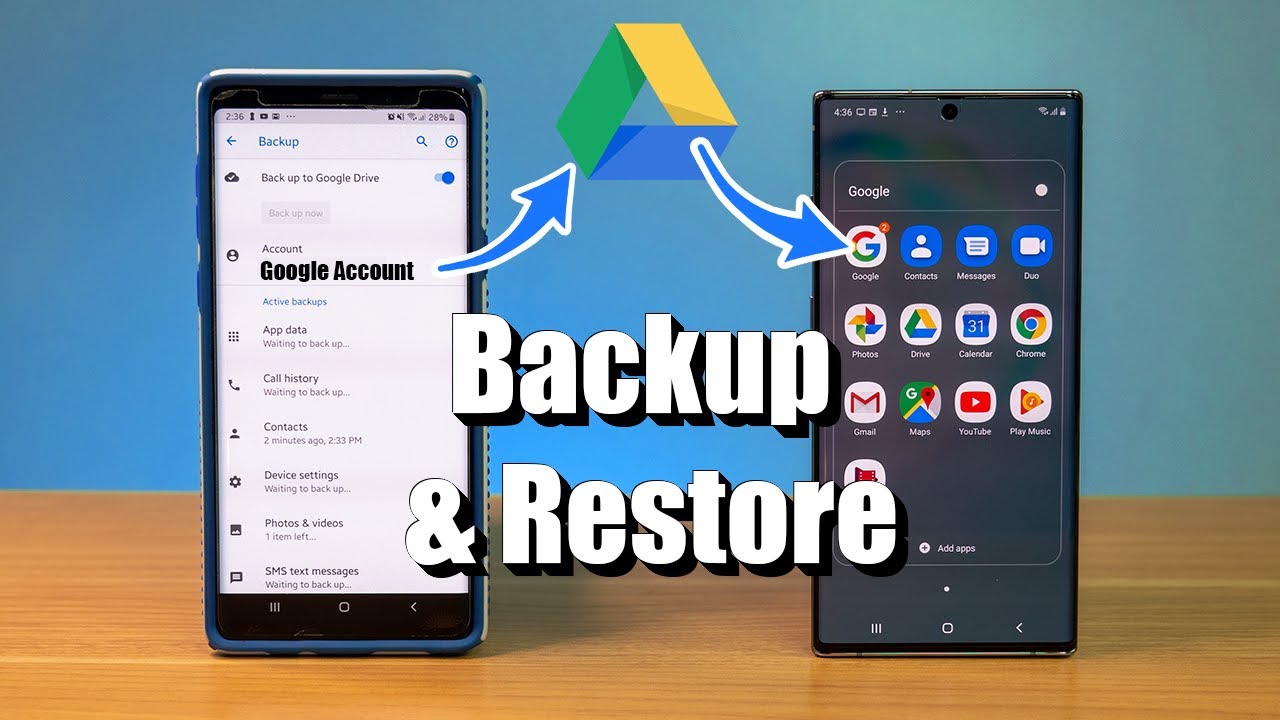
From A Google Account
If your phone doesn’t have a local backup option or if you don’t have an external SD card that you can save it to, you use this method instead. This is done by using your Google Account.
Google offers a service that lets you back up your files on the cloud. Oftentimes, this service will come up when you see your phone-specific local backup option.
This type of backup is more comprehensive though, as it allows you to back up even multimedia files such as photos, videos, and music, unlike your phone’s local backup, which will only save setting preferences and app data.
However, this type of restoration has a few caveats, as well. For one, its capabilities vary from version to version. Backups made on newer versions of Android can’t be restored on a phone with an older version of Android.
Two: although your Google Account will backup practically everything, that data isn’t necessarily going to be found all in one place. The Google Account backup built into your phone’s settings will only back up data similar to your local backup option.
In order to back up and restore more file types, like folders, documents, photos, videos, and music, you need to do multiple processes.
Remember, if you have issues with your Google backup, you should troubleshoot it first before attempting to restore it to your phone.
To find out how to restore the different types of backups from your Google Account, refer to the steps below.
Restoring Android Data
If you’re restoring Android data, such as contacts, SMS, setting preferences, wallpapers, app data, date and time, language, and input settings after a factory reset, it will automatically sync once you log into your Google Account for the first time.
The exact steps seen on the on-screen instructions will vary depending on your phone model, but it boils down to logging in using your Google email address and password.
If you’ve already set up your phone following a factory reset using a different Google account or without logging in at all, you can simply open a Google app, such as Google Play Store or Google Drive.
Opening these apps will prompt you to log into your account to access Google services, where you can restore your data.
Restoring Photos & Videos
Multimedia files will not be covered by the Google Account backup built into your phone. However, you can back these files using the specific Google apps for them.
For photos and videos, the Google Photos app will take care of the backup and restore. If you previously made a backup of your photos and videos on this app, here is how you restore it.
- Open the Google Photos app and log in using the Google Account where you made the backup.
- Tap Photos. If there’s an existing backup stored on your Google Account, the app will prompt you if you want to restore it to your phone.
- Confirm restoration and wait for your backup photos and videos to be downloaded and restored.
Manually Restoring Your Contacts
Your contacts are some of the most important information that will be automatically restored by Google once you log in to your account. However, you can also restore it manually with the following steps.
- Go to your phone’s Settings.
- Look for Google.
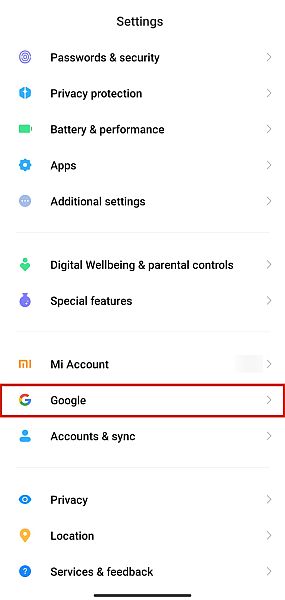
- In the Services tab, tap Set up and Restore.
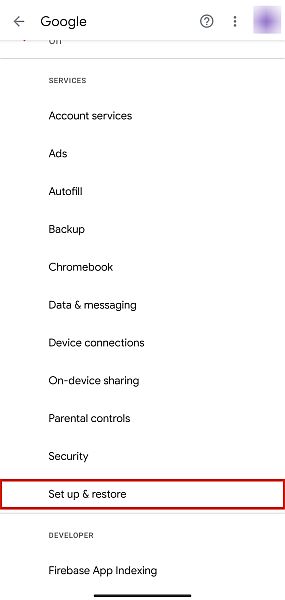
- Next, select Restore Contacts.
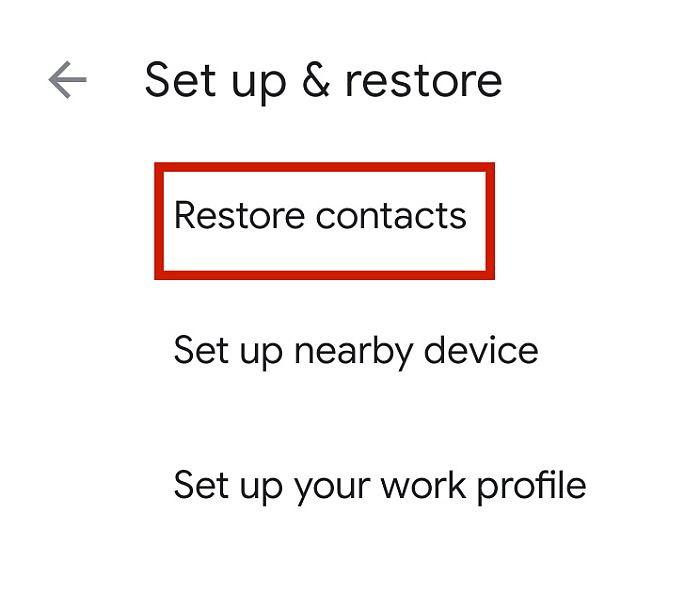
- If you have several Google accounts logged in, select the account where you backed up your contacts.
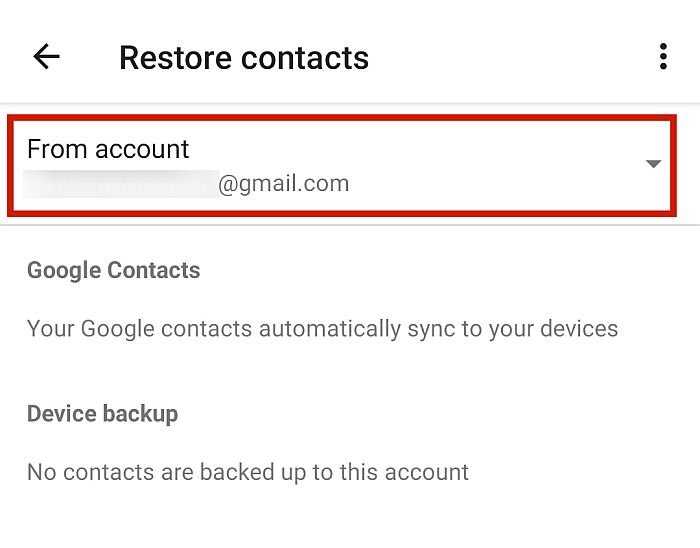
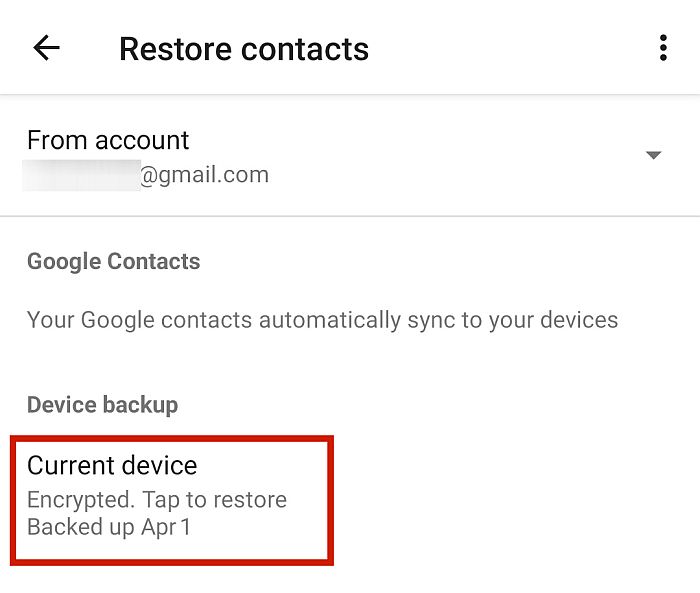
- Tap to Restore. This will download and restore the contact data that you have saved on that Google Account.
Restoring Files & Folders
Files and folders are typically saved and uploaded to Google Drive. Just go to Google Drive to choose and download the specific files that you want to restore to your Android device.
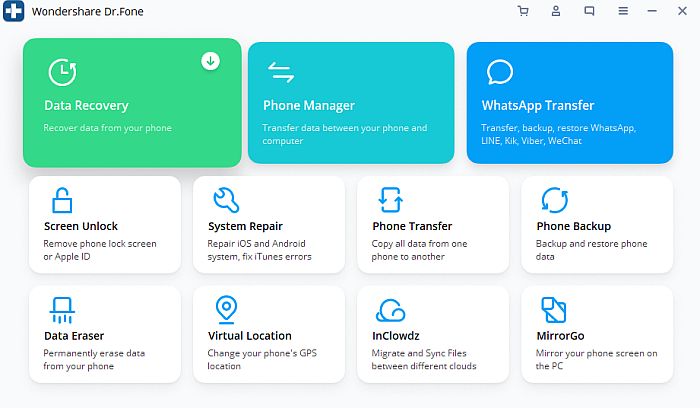
With The Dr. Fone Recovery Tool
Wondershare has provided a wide variety of essential services to mobile phone owners for years. With all this experience, Dr. Fone by Wondershare can cover practically any phone-related emergency.
The paid app has several powerful features that make it worth the money. Some of the most-loved features are lock screen removal, data transfers from Android to Android, iOS to iOS, or iOS to Android, secure data erasure, rooting for Androids, and data backup and restoration.
Read our exhaustive review of Dr. Fone here.
Most importantly, it functions as a superb data recovery tool. Dr. Fone can help you recover lost phone information, regardless if it’s because of deleted files, a damaged device, or a damaged SD card.
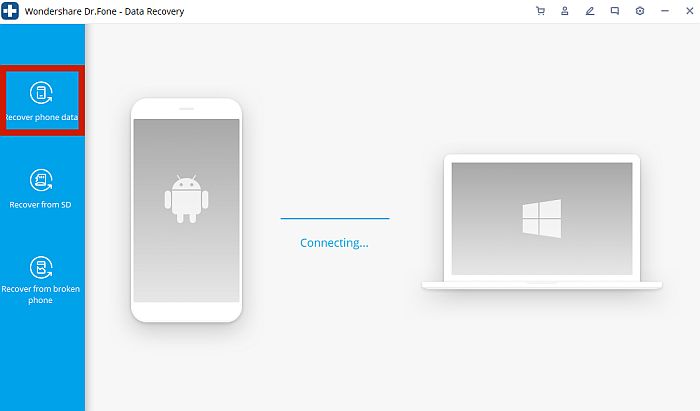
If your Android is fully functioning, the Internal Storage Mode will scan for deleted files and give you the option to restore them. This is the option that I’m going to use in the tutorial below.
Similarly, the other two modes – “Recover from broken phone” and “Recover from SD” – will retrieve data from a damaged Android and a damaged SD card respectively.
Dr. Fone offers a free version, however, this does not offer the features you’ll need to complete the file recovery process. To be able to access the full data recovery feature for Android, you’ll need to register for a licensed copy.
The basic license costs $39.95 for one year and covers one desktop and five mobile devices. If you like the app and would like to keep using it, you can also avail of a lifetime license for only $49.95.
If you’ve already registered, you’re all set. Follow the instructions below to restore the data from your Android device.
- Launch Dr. Fone on your PC.
- On your Android phone, go to Settings > Additional Settings > Developer Options and enable USB debugging.
- Connect your phone to your PC with a USB cord. Make sure to select Recover Android Data.
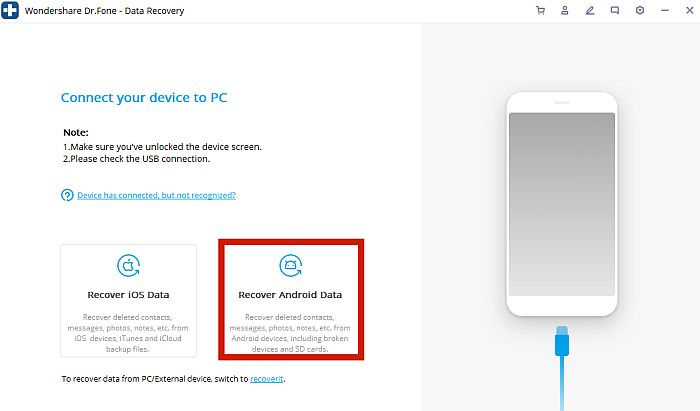
- The Dr. Fone interface should recognize that your phone is now plugged into the computer.
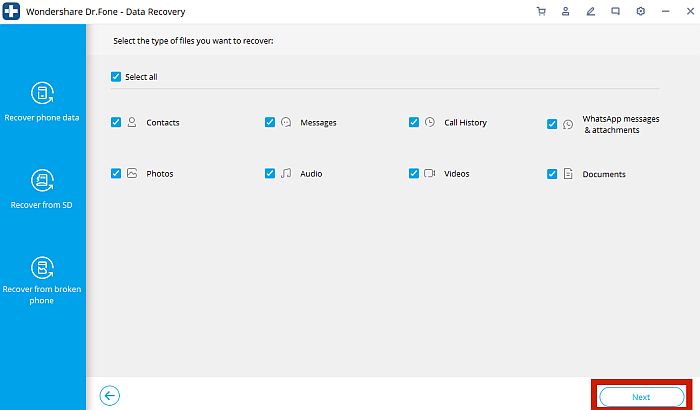
- Select which data you want to restore and click the Next button. This will initiate the scan for the data that you specified.
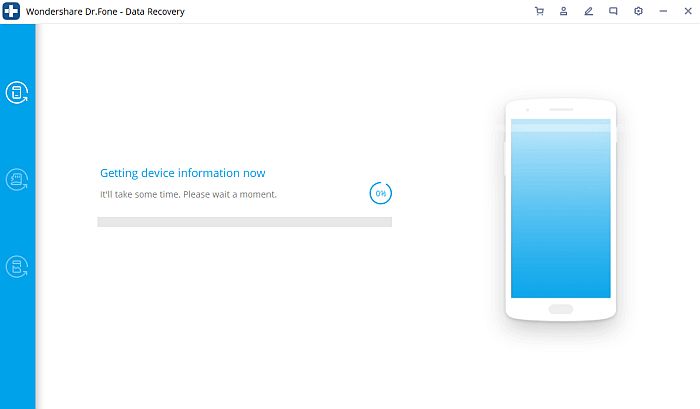
- Wait until the scan is complete. Once the scan is finished, Dr. Fone will then preview everything it found on your phone.
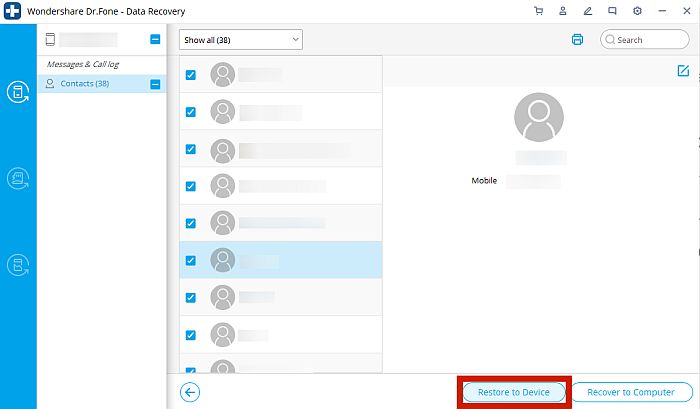
- Check the specific items that you want to recover and click Restore to Device. This will restore the salvaged files directly onto your phone’s internal storage. You can also choose to keep a backup copy on your computer by clicking Recover to Computer.
Why You May Need To Do A Factory Reset
If you want everything on your phone to be back the way it was fresh from the factory, a factory reset is your best bet.
Also known as a “master reset” or a “hard reset,” a factory reset forcibly deletes all user data from your phone and restores the system settings to default. User data can be defined as everything that the user has added to the internal storage of the phone when they assumed ownership of it.
Note that this only applies to the internal storage of a phone, as an external SD card will not be affected by a factory reset. The factory reset will also not harm system files, so it will leave alone any custom ROM or files that have root access.
There are several reasons why you may want to do a factory reset to your phone. One of the most common reasons is if you are trying to remove malware or virus from downloaded or transferred files. Or maybe you booted the phone in safe mode and can’t get out.
For people who have rooted devices, a factory reset is a quick and handy way to erase the cache and data partitions of the device in case you want to change or modify its ROM.
Lastly, if you are going to sell your phone, or are giving it away to someone else, then a factory reset is usually a recommended practice.
However, keep in mind that a factory reset is not always recommended for all devices, especially if your device has some preexisting, system-rooted issues. If you have a rooted phone and you messed around with system files and accidentally damaged them, for instance, then a factory reset won’t fix anything for you.
FAQs
Does a factory reset delete everything?
A factory reset will not delete everything on your phone. Factory resets only deal with user data on your phone’s internal storage. This means that system files, custom ROMs, and external storage, such as your SD card, will not be affected by a factory reset.
Can information be recovered after a factory reset?
You can still retrieve information that has been deleted by a factory reset. This is especially easy if you’ve already backed up your data beforehand. However, even without a backup, you can still recover deleted data by using powerful third-party apps, such as Dr. Fone.
How do I open my phone after factory reset?
You can open your phone as per usual after a factory reset. The only difference is that any app you installed, its data, and any data you stored on stock apps will have been deleted. The settings on your phone will also revert back to the default settings.
Android Data Recovery After A Factory Reset
Losing all your information on an Android device is often a stressful affair. After all, having all our data at all times is incredibly important for us to operate smoothly in this modern, interconnected world.
Luckily, there are three methods you can use to recover any data that you might have lost. You can restore your data from a local backup, restore data from Google Account, or use a third-party app, like Dr. Fone, to recover deleted files.
With these three options, you should have no problem with Android data recovery after factory reset. Also, take a look at Primo Android Data Recovery: it’s free and might help you as well.
And if you happen to have your WhatsApp backup on iCloud, you can use it to restore your WhatsApp as well.
Did you like this article? Don’t forget to leave your thoughts in the comments below and share this article if you think it might help someone you know!