Here’s how to restore deleted notes on your iPhone – open the Notes app then tap the back arrow to go to the Folders menu. Now open the Recently Deleted folder, select the deleted notes you want to restore, then tap “Recover” to move these notes to the Notes folder.
The iPhone Notes app is the perfect app to record random thoughts, ideas, reminders, to-do lists, and more. But if you’ve ever accidentally deleted a note or multiple notes on your iPhone, the first question you’ll probably ask yourself is “how do I get my deleted notes back?”
Don’t worry, I’ve got you covered. Here’s how to recover permanently deleted notes on iPhone in five different ways.
Contents
5 Easy Ways To Recover Permanently Deleted Notes On iPhone
I’ve tried different methods to recover permanently deleted notes on iPhone. In case you were wondering, you can also use these methods for an iPad too.
Two of the methods I tried required premium software, Dr. Fone and Stellar Recovery. Two other methods use free Apple software: iTunes and iCloud. So no matter your budget, there is a way for you to recover your deleted notes on an iPhone.
Tenorshare UltData is another iPhone management solution that lets individuals effectively manage their iOS phone’s storage. With UltData, you can execute multiple commands, such as recover permanently deleted notes on iPhone, or even go through your recently deleted folder.
However, before you can recover notes from your iPhone’s recently deleted folder, you must purchase a subscription for UltData first.
The UltData recovery module costs only $45.95 for one month, $49.95 for one year, and $59.95 for lifetime access when using it for individuals. This license covers one PC and five mobile devices.
If that sounds good to you, what are you waiting for? Subscribe now or check out my comprehensive review.
Recovering Deleted Data Through UltData
If you’ve already bought the Tenoreshare UltData that suits your needs best, you can begin the recovery process.
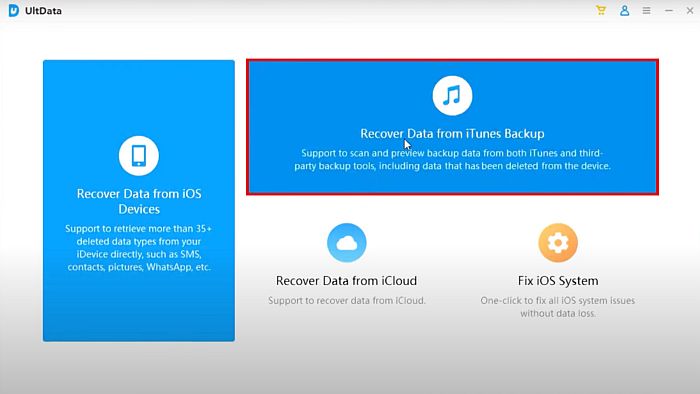
UltData allows you to use three methods to recover data from an iPhone device. You can recover straight from iOS devices, iTunes Backup, and iCloud Backup.
Recover Notes Through iPhone device
You can recover your iPhone’s notes directly from your iPhone’s recently deleted folder.
It will take you about 5 minutes
Here’s how to recover deleted notes through UltData on your iPhone.
- On your desktop, download and install the UltData app. Afterward, open it.

- Next, click the left-most option: Recover Data from iOS Devices.

- You will then connect your iPhone to your PC. UltData should recognize the connection and pair it with your phone.

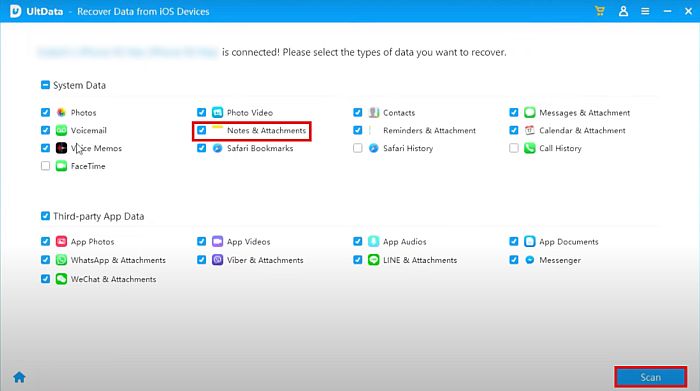
- You will then see a list of apps and data types on your iOS device. You will pick from here which kind of data you want to be recovered. Check the icon for Notes & Attachments, which you can find under the System Data category, and click Scan.
- UltData will now start recovering your deleted Notes.

- Once it’s done, you will now have access to your Notes, even the deleted ones.

Recover Notes Through iTunes Backup
Recovering deleted data directly from the iTunes backup is quick and simple. But did you know that you can also recover notes saved from an iTunes backup?
- Open the UltData app and click the Recover Data From iTunes Backup option.
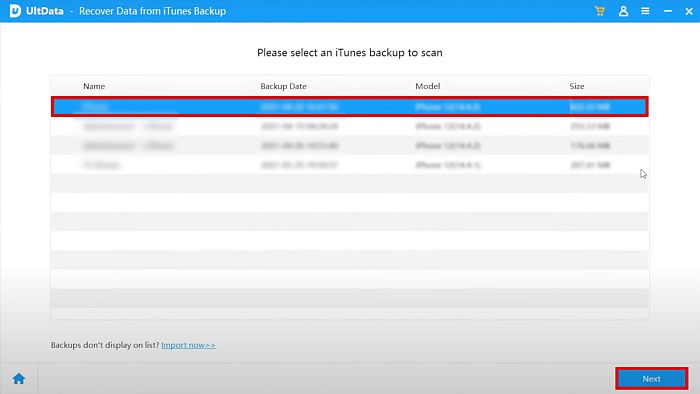
- UltData will then scan your device to look for any iTunes backup file on the computer. Once it finds the backup, the app will let you choose what data you want to restore. Check the icon for Notes & Attachments and click Scan.
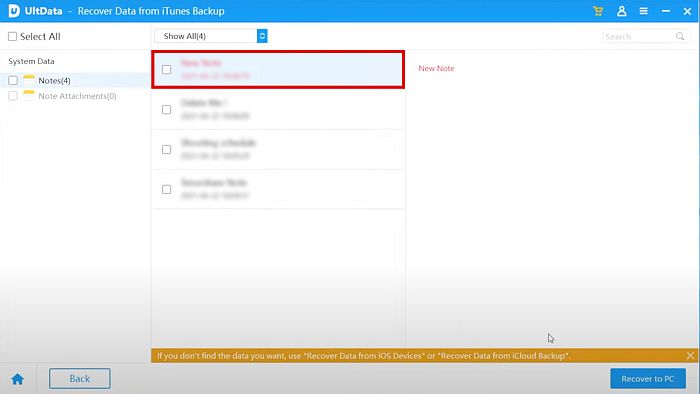
- UltData will look through the backup. Wait for it to finish.

- You can click and restore your deleted notes once the scan is done.
Recover Notes Through iCloud Backup
You can also do the same thing through the iCloud backup.
- Open the UltData app and click the Recover Data From iCloud Backup option.

- You will then be asked to sign in to the iCloud platform with your Apple Account. Enter your Apple ID and password and hit enter.
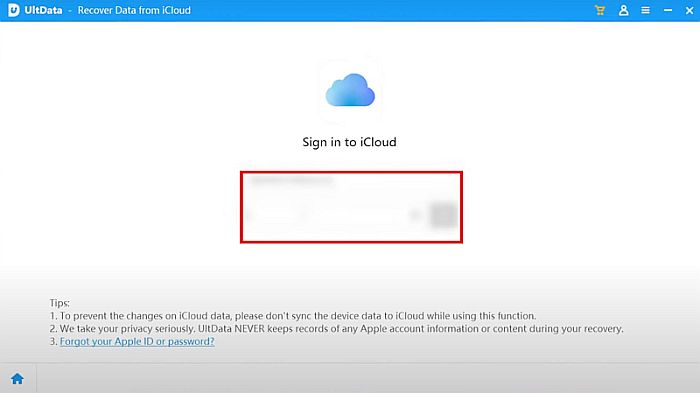
- You may also have to enter the verification code.

- UltData will then scan your iCloud account for a backup file. From here, click the types of data that you want to restore. Be sure to check the icon for Notes & Attachments and click Scan.
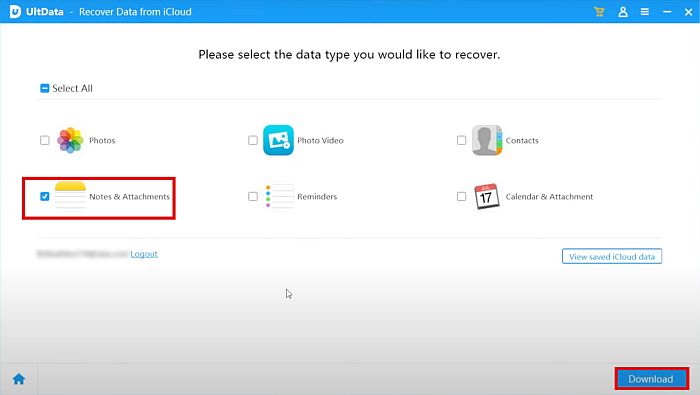
- UltData will now scan the backup for that specific data type and allow you to recover all of them.

You can also watch this video from Tenorshare:
Using Dr. Fone
Dr. Fone – Data Recovery is a data management app you can use to recover deleted files on both iOS and Android devices, and they offer annual subscriptions for their products.
If you’re only looking for a tool for iOS devices to recover your data, the 1-year subscription, which covers up to 5 devices and 1 PC/Mac computer costs $59.95. If you’re looking for the full iOS toolkit, which includes data recovery, phone transfer, system repair, and more, the cost is $99.95 per year.
Here, I’m going to show you how to use Dr. Fone to restore deleted notes on iPhone:
- Purchase your Dr. Fone license and download the software onto your PC or Mac.
- Open the software on your desktop computer and connect your iPhone to the computer using a USB cord.
The interface below will show that your device is being connected.
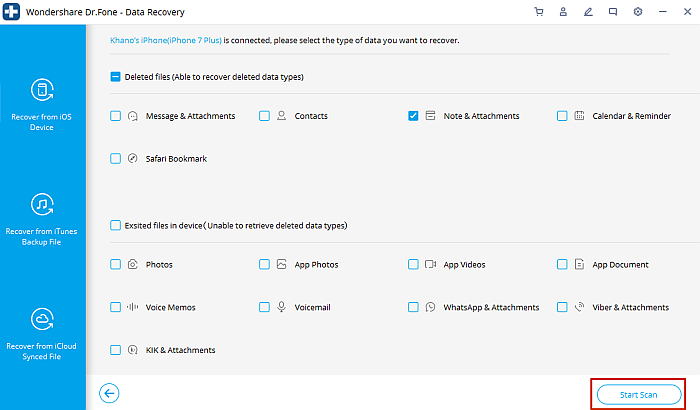
- After your iPhone has been successfully connected, you’ll see the different data categories to choose from.
Since you only need to recover permanently deleted notes right now, deselect every other option except for “Notes & Attachments.”
- Once you’ve unchecked all other data categories except for “Notes & Attachments,” hit the “Start Scan” button to begin scanning your iPhone for deleted notes.
- Dr. Fone will begin scanning your device for current and deleted notes. The time will depend on how much data is on your phone. You’ll see the following interface and an estimated remaining time until completion.

- Once the scan has been completed, you will see all the notes on your iPhone, current and deleted, displayed for you to pick and choose from. Select the notes you want and click “Restore to Device” to restore them to your iPhone or “Recover to Computer” to save them to your PC/Mac.

Here’s a video tutorial that explains how to recover permanently deleted notes on your iPhone with Dr. Fone:

Dr. Fone is a great tool to recover data that’s sure to come in handy, not just for deleted notes on your iPhone, but for messages and other forms of data as well. If you want to know more, check out my detailed Dr. Fone iOS Review.
If you’re already sure Dr. Fone – Data Recovery is the right tool for you, you can get it here.
Using Stellar Recovery
Stella Recovery is a data management app that can be used for iOS and Android devices. You can use it for data transfers between devices, backups, and recovering data. Stellar Recovery’s subscriptions are done on an annual basis.
The Standard Plan, which allows for data recovery on iPhone, iPad, iCloud, and iTunes, is available for $39.99 per year. The Toolkit, which offers recovering data, as well as a data eraser for iOS devices, is available for $49.99 per year. Both plans cover up to 5 devices and offer unlimited recovery.
If you’re interested in a plan that covers more than 5 devices, Stellar Recovery offers a Toolkit Plus plan that supports up to 50 iPhones.
Here I’ll show you how to use it to recover permanently deleted notes from iPhone without backup.
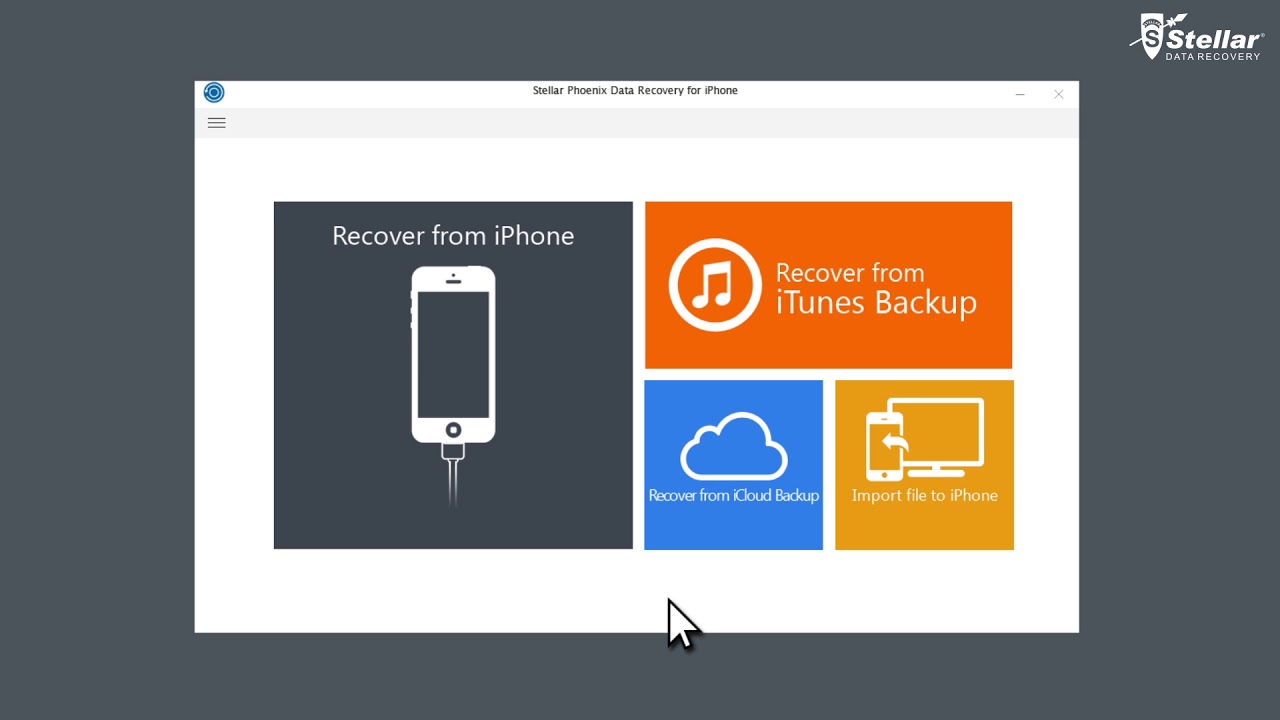
- Purchase your Stellar Recovery subscription and download the software on your computer.
- Open the Stellar Recovery app on your computer. On the home screen, you’ll see that the “Recover from iPhone” option is automatically selected, with every data category checked for recovery. Uncheck every category except for “Notes & Reminders.”
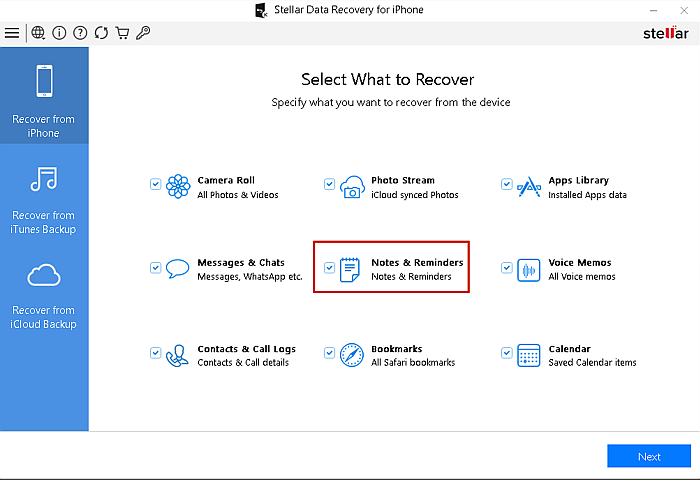
- Once you’ve deselected every other data category except for “Notes & Reminders,” click “Next” at the bottom right-hand corner of the screen.

- Stellar Recovery will now ask you to connect your iPhone to your computer. Connect it using a USB cord and wait for Stellar Recovery to recognize it.

- After Stellar Discovery recognizes your device, select your iPhone and then click “Scan.”

- Stellar Discovery will scan your iPhone for its current and deleted notes.

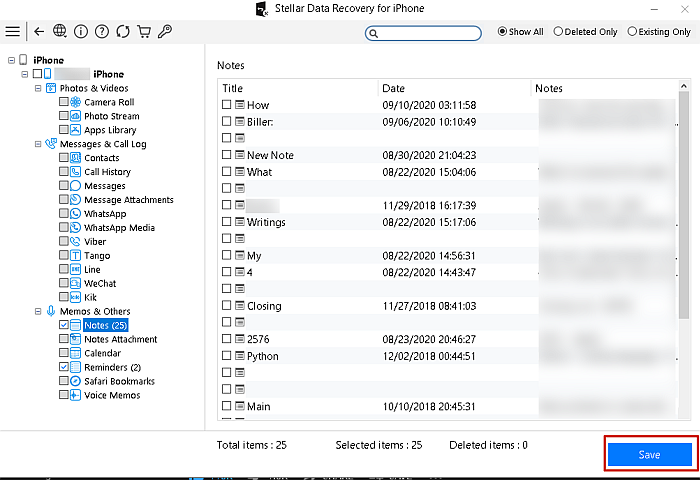
- Once the scan is complete, you will see the following interface. You need to select the “Notes” category to preview the results.

- If you’re not satisfied with the results of the initial scan, there is an option to do a Deep Scan and go even further into your iPhone.

- The Deep Scan takes a while, as it searches your phone more thoroughly than the initial scan. While it takes place, you’ll see the following interface:

- Once the Deep Scan is finished, you’ll see a pop-up stating it’s completed. If there is more data to be found, Stellar Recovery will show you, however, if like me, there was nothing else to be found, you’ll see the following pop up:

- After Stellar Recovery’s Deep Scan is completed, you can preview its findings by clicking on the Notes category like you did in Step 6. This will allow you to see the notes that Stellar Recovery discovered, as well as save the notes you want.
Here’s a video tutorial on how to use Stellar Recovery to recover permanently deleted notes on an iPhone:
Stellar Recovery works great not just for recovering deleted notes on your iPhone, but also messages, call logs, and more. Check out Stellar Recovery to find all of your lost iPhone data.
Apart from that, the company also offers a tool to repair videos on mac and Windows; check our review to learn more!
Using iCloud
iCloud is Apple’s cloud storage service, and it’s used to back up and store data by Apple users. It’s a great way to recover deleted data, such as notes, as well as other files, such as pictures, videos, and more.
Using The iCloud Website
- Go to icloud.com and log into your iCloud account.

- After logging in, click on Notes.
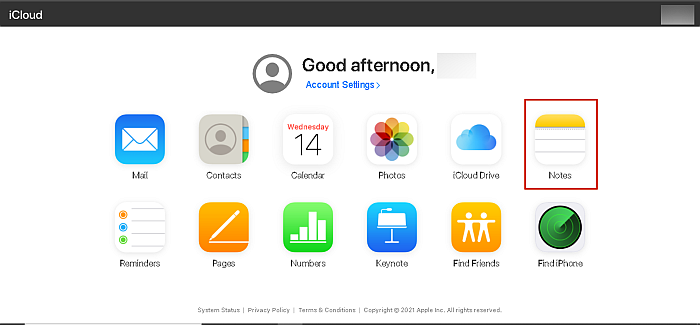
- Once you’ve clicked on Notes, click on Recently Deleted.

- Select the items you want to recover then click “Restore.” This will restore your previously deleted notes.

Using iCloud Backup File
If you have an iCloud backup enabled on your iPhone, you can use it to recover your deleted notes. The process is fairly simple, however, it’s important to note that you’ll need to wipe all the data from your phone first.
- On your iPhone, open Settings > General > Reset, then select “Erase All Content and Settings.” This will wipe your phone clean, essentially resetting it.

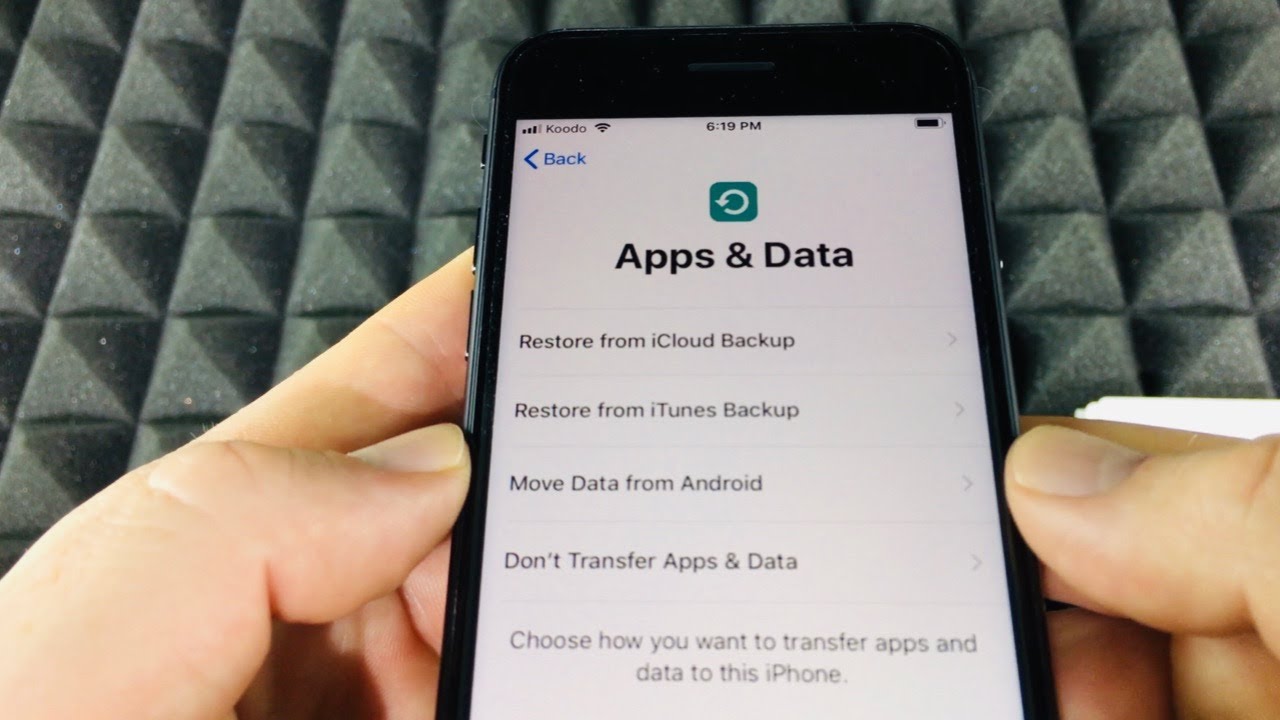
- You will then need to set up your phone once again, when doing this, select the “Restore from iCloud Backup” option and sign in with your Apple ID.
- Choose the iCloud backup which has your deleted notes. All of your data from your iCloud backup file will be restored to your phone including your once deleted notes.
Here’s a video tutorial on how to recover permanently deleted notes on iPhone by using an iCloud backup:
Using iTunes Backup
If you use iTunes to regularly back up your iPhone, there is a high chance that your deleted notes may be in your iTunes backups. It is important to note that restoring the backup will override your iPhone’s current content. You also won’t be able to see what is stored on that backup, so it’s a matter of faith.
- Open iTunes on your desktop and connect your iPhones using a USB cable.
- Click the phone icon to see your iPhone’s data summary.

- On that page, you’ll see a “Restore Backup” option under the “Manually Back Up and Restore” area. Click it to restore it to your iPhone.

- Once you’ve done this, iTunes will begin restoring your iPhone using the chosen backup. Remember not to disconnect your iPhone during this process.

- Once restored, you’ll see the following pop-up letting you that process is complete. You can now check your Notes app to see your once deleted notes.

Here’s a video tutorial on how to restore your iPhone using an iTunes backup:
FAQs
Can you recover deleted text in notes on iPhone?
You can recover deleted text in notes on iPhone using the Notes app or iCloud. You can find deleted notes in the Recently Deleted folder in the Notes app, or you can use an iCloud backup to recover a deleted note that you need but accidentally deleted.
Where is the recently deleted folder on iPhone?
The recently deleted folder on your iPhone is found in the Folders menu in the Notes app. Open Notes then tap the back arrow in the upper right-hand corner of your screen. That will take you to the Folders menu where you can find the recently deleted notes folder.
How To Recover Permanently Deleted Notes On iPhone – Wrapping Up
How did you like this tutorial? These methods were the ways I was able to recover deleted notes on iPhone. They work well with both old and newer iPhones, so whether you’re using an iPhone 6 or an iPhone 12 Pro, you’re covered.
If you’re interested in recovering more than deleted notes on iPhone, check out this article that talks about the best iPhone data recovery software. However, if you’re more interested in recovering WhatsApp messages, you can learn how to do that here.
Tenorshare UltData, Stellar Recovery and Dr. Fone – Data Recovery work well as premium paid options to help recover permanently deleted notes on my iPhone. However, if you’re on a budget, iTunes and iCloud backup work well too, just be sure to frequently back up your iPhone.
If you also need to recover texts, read our post about recovering deleted text messages on iPhone without computer.
Thanks for reading and be sure to comment down below, as well as share this article with your family and friends!