Just go to a public place, a shopping mall maybe and randomly turn ON WiFi on your device. You will realize that within a second your device is flooded with tons of WiFi hotspots. Some of them are even free and connect automatically while some need you to login or pay. Among all those networks your phone or laptop try to automatically connect to a network which it thinks is the best. But sometimes the network you are connected to is just a WiFi hotspot someone forgot to turn off or a slow network. Your device connects to a network depending on various factors like signal strength, security, the stability of a WiFi network, etc.
Due to this, most of the time you are not connected to the best available WiFi near you. Luckily there is a way by which you can take control of this whole process of sorting out networks. That process is called prioritizing WiFi networks. In this post, we are going to tell you how you can do it on your Windows PC, Mac as well as mobile devices. So you can choose your preferred network for connection and achieve smooth connectivity.
Contents
Prioritize WiFi Networks
1. Windows PC
In Windows 10, when the WiFi is turned ON on your system it will only connect to a network you have set to connect automatically. And if that network is not available, it will leave it as it is and wouldn’t connect to any other networks. Even if there are other WiFi options available in the vicinity you will have to manually select a network and connect to it. However, you can change the priority of each connection and ensure that your PC connects to your preferred networks automatically. Here’s what you need to do in order to prioritize WiFi networks on your Windows PC.
1. Press Windows icon and look for Command Prompt using the search option.
2. Right-click on the Command prompt when it shows up and select Run as administrator option.
3. Use the following command – netsh wlan show profiles and hit Enter.
This will show you a list of all the available networks and networks you have connected in the past. For the next steps, you need to first figure out which networks you want to prioritize.
4. Once you have done that, type the following command –netsh wlan show interfaces and hit Enter again.
This will show you the name of adapters that you use on your PC to connect to the internet. It is generally Wi-Fi or Ethernet and if you only use WiFi then your interface name is Wi-Fi by default.
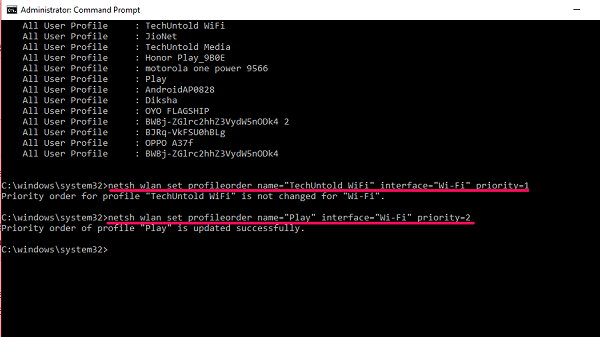
5. Finally, to change the network priority, you need to type in the following command –netsh wlan set profileorder name=”[Network Name]” interface=”[Interface Name” priority=1,2,3… and hit Enter.
Where Network Name is the name of the WiFi network you want to assign priority, Interface Name is Wi-Fi or Ethernet and 1,2,3… is the number of priority you want to assign a network at. As an example, I have set TechUntold WiFi on priority 1 by using this command- netsh wlan set profileorder name =”TechUntold WiFi” interface=”Wi-Fi” priority=1.
Similarly, if you want to assign 2nd priority to another network then replace the network name and set the priority number to 2 and so on. This way if the first WiFi network is not available your computer will automatically try to connect to the next one on the priority list.
Also Read: Best Wi-Fi Adapters For Desktop
2. Set WiFi Network Priority On macOS
Like other operating systems macOS too lets you prioritize WiFi networks on your MacBook. This feature has been there for a long time and no matter which version you are running on your Macbook you can still do it. This is the simple procedure that you need to follow :
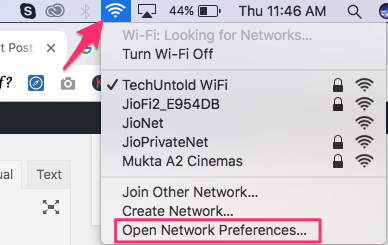
1. Click on the WiFi icon located on the upper right side of the screen.
2. Select Open Network Preferences from the options.
3. Once the Network window opens, select Wi-Fi from the left side menu and click on the Advanced button at the bottom.
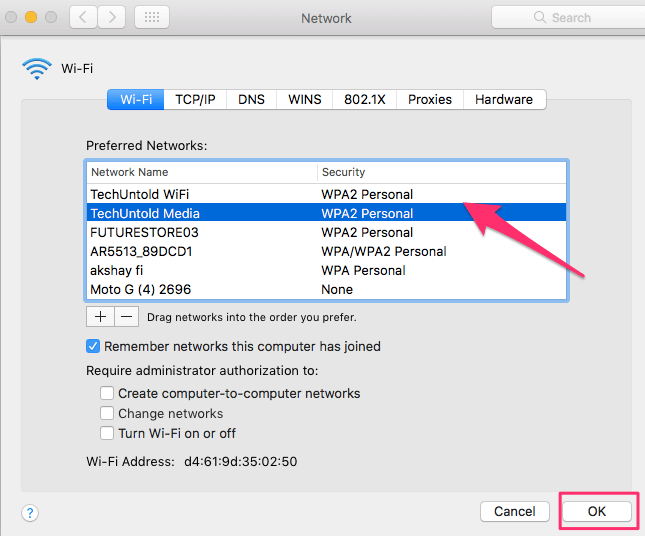
Furthermore, a list of Preferred Networks will open up. In this list, you will see all the available and previously used WiFi networks. These networks are already set in in a priority order i.e. network on the top of the list has the highest priority and vice-versa.
4. From here you just have to drag and drop those network in the list to set them according to your preferences.
5. Finally, click OK and then Apply to implement new WiFi priority settings on your Mac.
Also Read: Quick Ways To Force Quit On Mac
3. Prioritize WiFi Network On Android Devices
There is no dedicated WiFi prioritizing feature available in Android operating software. To be honest I never need it on my phone as it automatically switches to another network once one stops working. But don’t worry you could still do it if want to by using various third-party apps. Besides Android is highly customizable and has third-party applications for almost everything. In fact, the one we found effective for this purpose is WiFi Prioritizer. Apart from prioritizing networks, this app constantly checks signal strength and switch to a network with better signal strength. To work through the app you need to follow these steps:
1. Install the app from Play Store using this link and then open it. Next, switch ON the Enabled Scheduled Job toggle.
2. Now you can see all your saved networks in a numbered list. The network priority is set in descending order. You can just drag and arrange these networks to change their priority.
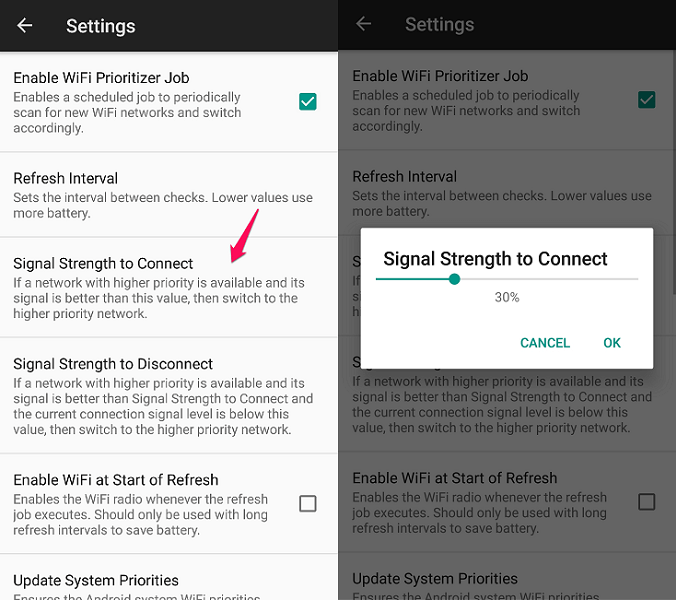
The networks will now auto-switch according to the priority set on the application. As an additional option, this app also allows you to set the refresh interval from its settings menu. Just tap Refresh Interval from the menu and choose the interval you want to set. Keep in mind that lower interval refresh can consume a lot of your battery.
In the same settings menu, you can also set signal strength of a network to connect. That means it will only switch to a higher priority network if the network meets the set quota of signal strength. If the signal strength of the higher priority network is lower than say 30% then it will not switch from the current network.
Note: If you ever want to disable WiFi prioritizer you can simply switch OFF the Enabled Scheduled Job toggle.
Also Read: How To Get Assistive Touch On Android
4. Prioritize WiFi Networks On iPhone
Unfortunately, there is no way of setting priority for networks on the iPhone. You can however indirectly do that by syncing it to your MacBook. Setting network priority on macOS is enough for an iOS device. Make sure you first prioritize the networks on Mac and sign in using the same Apple ID on both devices, otherwise it won’t work. Same can be done with an iPad and iPod as well. As long as they are all synced with each other and using the same Apple ID your WiFi networks are prioritized.
The downside is they will both run on the same prioritization and automatically connect to the same network. So if you need them to connect to different networks you will have to do it manually. Also if you don’t own a Mac device then you don’t have any other options.
Also Read: Clear Spotlight Search History On iPhone
Conclusion
The command line method of setting priority pretty much works in every Windows version. If you don’t want to go through a lengthy process, mark Connect automatically while connecting to a network. This will set that particular network to the highest priority. On other devices setting WiFi priority is short and straightforward. Personally, for me, it worked really well as I was able to switch easily between networks. We hope these methods work out for you as well. If they did then please let us know in the comments. We would love to know your thoughts.


