Spreadsheets are a great tool for organizing, analyzing, and storing data in a tabular form. Companies use spreadsheets to make important decisions and future plannings by analyzing the data. If you are a data analyst or someone who deals with data on a regular basis then you must know that there are bound to be duplicate entries. They may be due to human or computer errors.
It takes extra effort and time for one to deal with duplicate data. So if you want to find and remove the duplicate entries in Google Sheets then look no further as this article is going to answer all your queries.
Recommended: How To Import CSV To Google Sheets
Contents
Remove Duplicates In Google Sheets
Google Sheets provide you with a couple of methods to deal with duplicates. We have classified these methods into 2 categories. The first category deals with methods that will allow you to manually find and remove duplicates. While the other will show you how to automatically remove duplicate entries.
Find And Delete Duplicate Entries Manually
Using this method you can highlight each of the duplicate entries and then manually delete them. Here we are going to show you two methods to do so.
1. Using Conditional Formatting
1. Go to Google Sheets and open the document which you want to edit.
2. Once the document is open. Select all the data you wish to edit by clicking on one entry and then press ctrl+A to select all. Now, go to Format>Conditional formatting from the toolbar at the top.
3. After that, a new Window will open on the right side of the screen as shown in the screenshot below. Here go to Format cells if and click on the drop-down menu.
Note: The range will be automatically filled in Apply to range field so you should not worry about it. That said, you can change or enter it manually from here if required.
4. From the drop-down menu, select Custom formula is. So as to apply a custom formula because there are no inbuilt formulas to highlight duplicates in Google Sheets.
5. Once you do that, enter the following formula under the Custom formula is option =COUNTIF($A$1:$A1,$A1)>1
Note: The Countif function counts the number of times the entries are duplicated in the data and then highlights them.
6. Now you can change the color and font of the highlighted entries if you want under the Formatting style or you can let them as default and then click on Done.
7. Now you will see only the duplicate entries get highlighted.
8. Once the duplicate rows are highlighted then you can easily delete them. For that right click on the highlighted row and Delete row option.
9. You can do that for all the highlighted duplicates and in the end, you will get data with only unique entries.
Using the above option, you can easily remove duplicate entries in Google Sheets.
2. Using Remove Duplicate Add-On
Under this method, you will have to download a Chrome extension for the Google sheets. The steps to use this add-on are as follows:
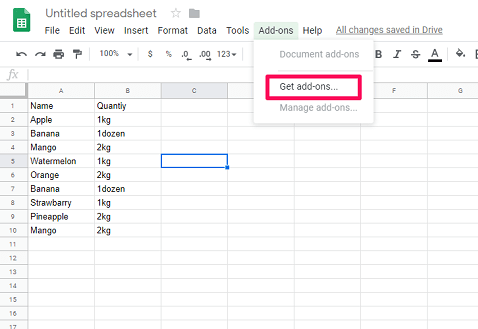
1. Firstly, click on Add-ons in the toolbar at the top and select Get add-ons.
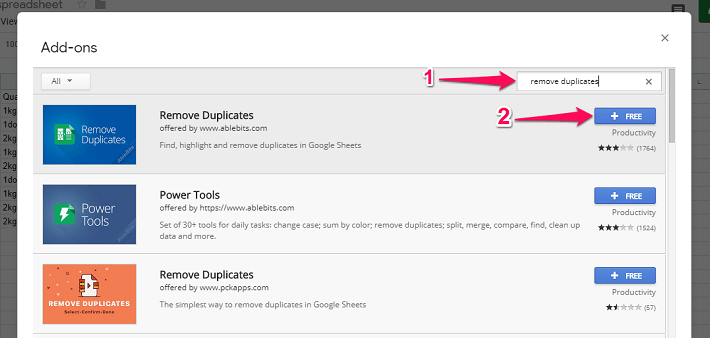
2. Now, search for Remove Duplicates in the search bar and press enter. Once the result shows up click on +Free button to install the add-on for free. Choose the desired Google account when prompted and allow the add-on to access your account.
3. After that, again go to Add-ons. This time select Remove Documents>Find Duplicate or Unique Rows.
4. Now a tab will open asking to Select your sheet and range. You can directly click on Next as the range will be automatically selected.
5. After that, a second tab will open. In that, it will ask you to choose the type of data you want to find; Duplicate or Unique. Click on Duplicates as you want the duplicate entries to get highlighted and click on Next.
Note: If you want your original and duplicate entries both to get highlighted then you can use the Duplicates + 1st occurrences option.
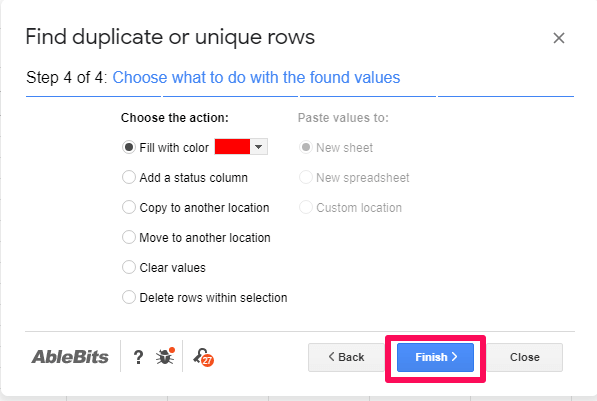
6. In the third tab, you can just click on Next. And on the fourth and last tab, it will ask you what to do with found data. You can select any options from the tab if you want and click on Finish.
Note: You can also select the last option – Delete rows within selection to automatically remove duplicates from the data without highlighting them.
7. Now, wait for a few seconds as the duplicates get highlighted. And after that, you can manually delete them if you want.
Note: Highlighting duplicates and removing manually in a long data set can be a tiresome process. Therefore you should use these methods only for small data sets or when you just want to check if there are duplicates in your data set or not. In other cases, we recommend you to go for the following methods.
How To Remove Duplicate Entries Automatically In Google Sheets
If you are dealing with a large set of data you can use any of these methods.
1. Using Unique Formula
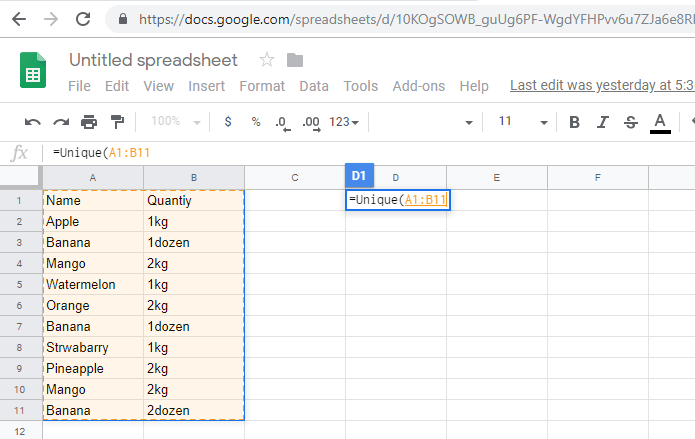
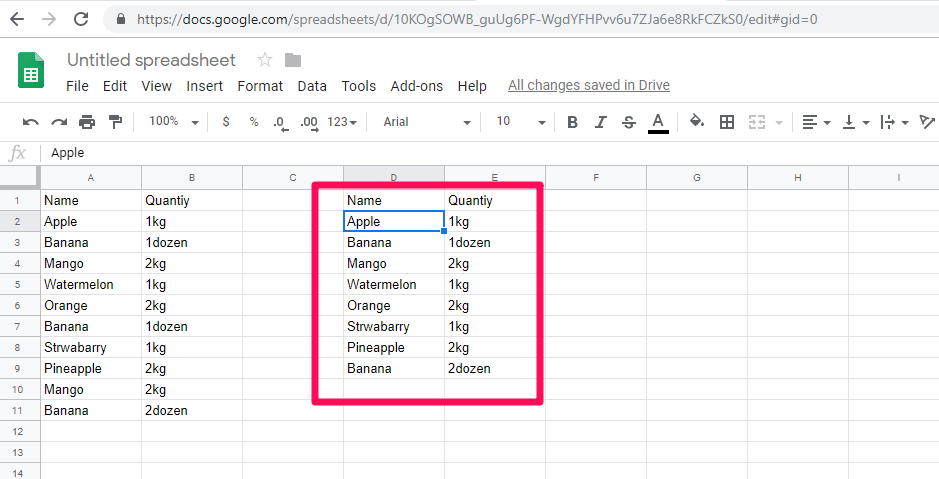
In this method, we are going to use a formula to remove duplicate from our data. The formula which we are going to use is =unique(Range) where Range is the range of the data set. The steps to use the formula are as follows:
Important: This formula won’t be able to work with case-sensitive data. However, you can change the data to lower case or upper case in Google Sheets before applying this formula.
1. Go to Google Sheets and open your document.
2. Once you open your document choose an empty cell where you would like to see the results. As in my case, I chose the cell D1 to show my result. Now type =Unique( in that cell.
3. Now you can manually type the range or you can select all the data to automatically fill the range in the formula.
4. Once the range is filled, close the bracket and press Enter.
5. As soon as you press Enter you will see a new set of data with all the duplicates removed automatically.
2. Using Remove Duplicate Settings
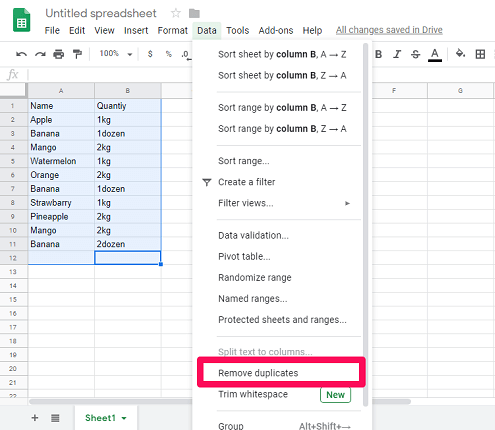
1. Go to your spreadsheets and select all your data.
2. After your data is selected go to Data on the toolbar and select Remove duplicates from the settings menu.
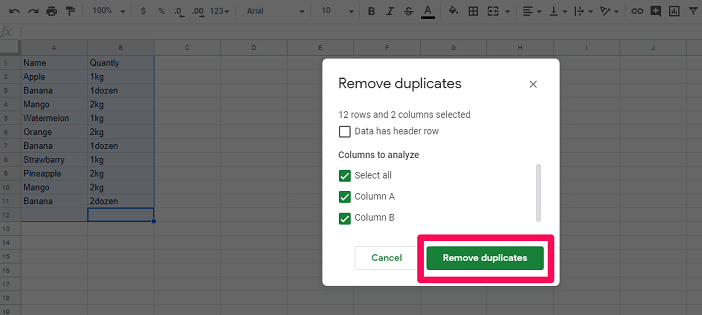
3. Now a new window will open. Here select the desired columns and click on Remove Duplicates.
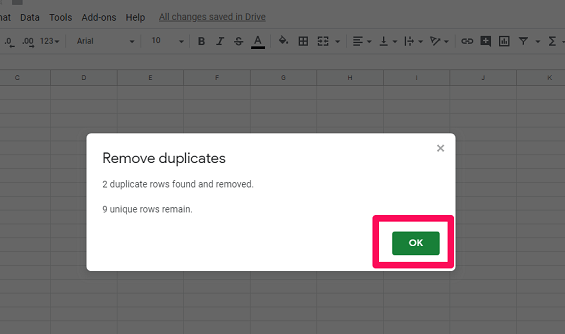
4. After that, it will show you the number of duplicates that have been found and removed from your data. You can simply click on Ok.
With this, you will see a new unique set of data that has no duplicate entries.
3. Using Script Editor Tool
In this method, we are going to use the Script Editor tool on Google Sheets to create a web application to remove duplicates automatically. This method is basically for the programmers but you can still use it if you are not, as the code to create the app is available on Google’s developer site. You can simply copy and paste that code in the script to make the application to remove the duplicates in the Sheets.
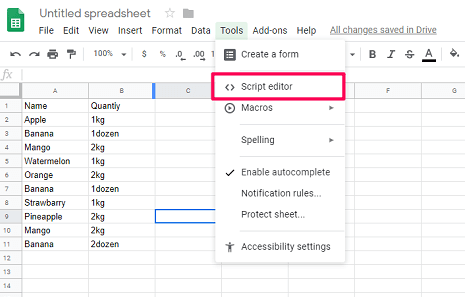
1. Open your Spreadsheet in Google Sheets. Click on Tools and select Script Editor.
2. The Script Editor will open in a new tab. Now, before writing any code in the Script Editor it’s better to name it. And for that click on the Untitled project and change the name. Next, click on OK.
3. After that, you can copy paste the code to remove duplicate rows in a Spreadsheet available on Google Apps Script.
4. Once the code is ready click on RUN as shown in the screenshot below.
5. After that, the editor will ask you for permission. To give permission click on Review Permissions. Also, it may ask you to log in if not already logged into your Gmail account.
6. Wait for a few seconds as the application removes the duplicate entries. Now open the tab in which Google Sheets is running. Here you will find that all the duplicate entries are removed and only unique entries are remaining.
Conclusion
These methods work pretty fine to remove the duplicates in Google Sheets. And you can use any of the methods listed above to de-duplicate your data on the spreadsheet. However, we recommend you to make a copy of your original data before applying these methods just for future reference. Also, if you feel any trouble while applying these methods you can ask us for help in the comments section below.


