Who doesn’t need a data saver these days? From students to employees to homemakers, everybody wishes for a more economical data spending. Afterall such high is the price of data pack these days. We know the annoyance one faces when running out of data in the middle of browsing some interesting content. Data saver comes to the greatest rescue to those who literally live on a shoestring budget and can’t afford expensive data packs. So people look for the ways to block mobile data/WiFi for specific apps on their devices.
Though you can always restrict the app background data on your Android smartphones, yet we have to say that this often results in abnormal behavior of the apps. What’s more, the phone does not offer some great features when going frugal on WiFi data as well. Moreover, to manage data via phone’s settings is pretty cumbersome. An app which can offer a dexterous and efficient data management is definitely the need of the hour. It makes data control a lot easier and full-ranged.
Contents
Steps to Turn Off Internet Access for Certain Apps
Method 1: Block Cellular Data
Today we will throw light on the steps required for restricting the apps from using the cellular data on Android using the DataEye app.
- Open Google Play Store and search for the “DataEye” app or use the following link.
- Install the app. After the installation process is done, open the app.
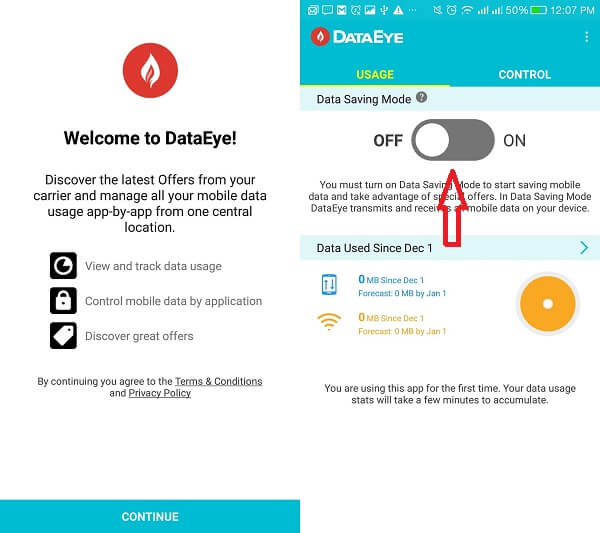
- Press “Continue” to agree to the terms and conditions, and privacy policy of the app.
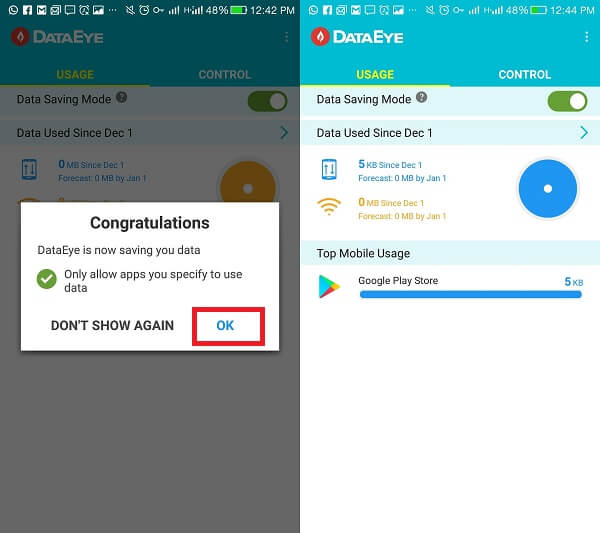
- Now, just toggle ON the big button under the heading “Data Saving Mode“. This is the most important step because without this step the method won’t work. So make sure this button is always enabled. The button will turn green when toggled ON.
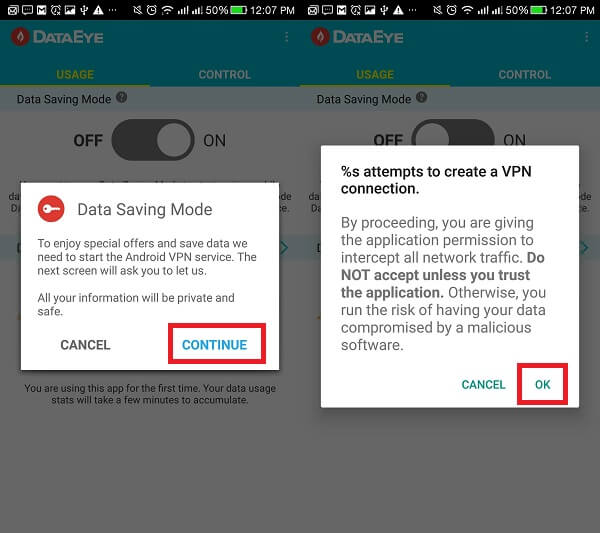
- After that, the app will ask for your permission to create VPN service. Press “CONTINUE“.
- Now the app will seek your approval to monitor all the network traffic. Press “OK” to continue.
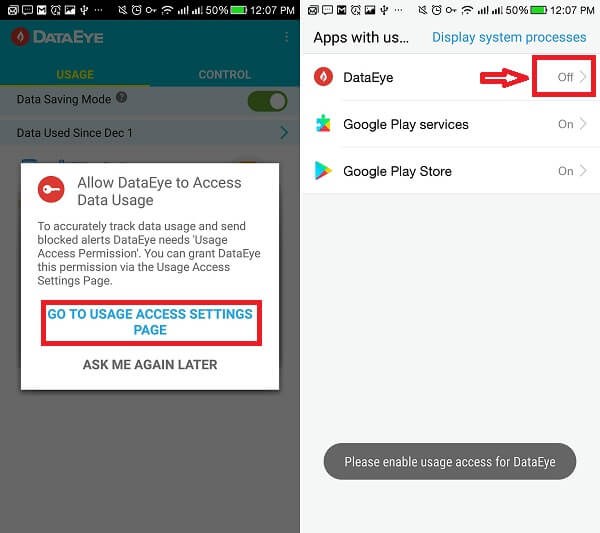
- Next, you will be asked to grant the “Usage Access Permission” to the app. Tap on “GO TO USAGE ACCESS SETTINGS PAGE“.
- Now, you will see the access page on your device on which the usage access to DataEye will be turned off initially.
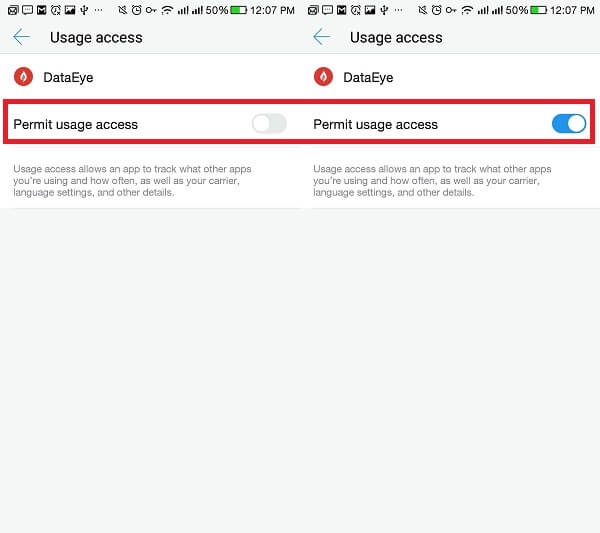
- Tap on that option of DataEye and toggle on the “Permit usage access” button.
- Instantly a pop up will show up congratulating you. Simply press “OK“.
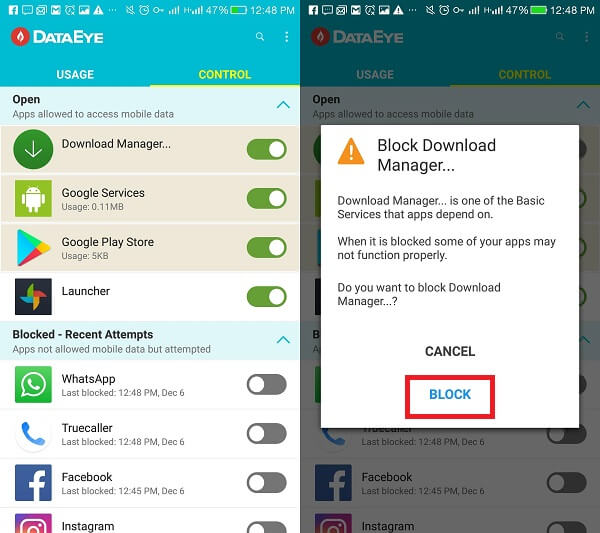
- Now, you are nearly done. DataEye has already blocked cellular data leaving out only one or two system apps like Download Manager, Google Services, Launcher, etc. Under CONTROL tab, you can revoke data access to these apps too by simple toggling off the button right in front of those apps’ names. After that just select “BLOCK” on the pop up which will appear.
This is how you can easily disable apps from accessing your mobile data.
NOTE: Don’t kill/close the app, just come out of it. On killing the app, the Data Saving Mode gets disabled automatically. Hence the app will no longer be able to restrict the data.
We tried to send a message via WhatsApp to see if it was really working. We were amazed at the functioning of this app and the hold it grabs over the data control. It rendered WhatsApp unable to send any message.
Method 2: Disable WiFi for Specific Apps
Now, we will show you how you can block the data to the apps even on a WiFi connection.
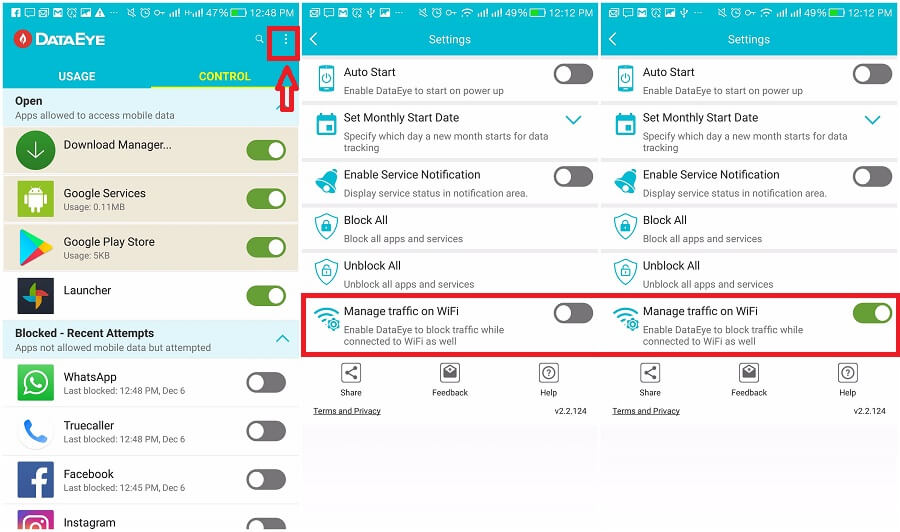
- Within the DataEye app, select the “three-dotted” option on the top right corner of the screen and select Settings section.
- There you will find the option “Manage traffic on WiFi“. Simply toggle it ON and you are done.
READ ALSO: How to use Mobile Data & WiFi Together
What if you need to get the data access back to any specific app?
Just follow the below steps for both cellular data and WiFi.
- Open the DataEye app and again turn the Data Saving Mode. You will only need to follow this step if you are reopening the app after killing it.
- Now, tap on the “CONTROL” tap on the top right corner of the screen.
- Here you will find all the apps. Just toggle ON the button for any app whichever one you want to grant data. The button turns green in color as soon it is toggled ON. The green color of the button shows that that particular app is now entitled to access data. That’s it!
So this is how you can turn on/enable cellular or WiFi data for apps in an easy and hassle-free manner.
Conclusion
Now, many of you might be querying that the same internet access restrictions on the apps can be applied by simply visiting the settings of your smartphone. But, to all who think that way, we can say that this app particularly is very easy to use as compared to the knotty settings to accomplish the same, and also it does not hog up a great space in your phone’s RAM. To achieve data-restriction via phone’s “Settings” can be a bit complicated and even way more jumbling to uplift the data restriction again.
Also, it is the system apps namely Android OS, Download Manager etc. which gobble up a major chunk of your cellular as well as WiFi data. They are the major background data-eater culprits. Revoking the data access to these inbuilt apps is not possible by visiting the phone’s Settings. You need an app to achieve that. Furthermore, there is not much data saving you can perform via settings when you are in a WiFi connection. DataEye helps you in achieving outstanding data-management even on WiFi.
