DNS (Domain Name System) is a function that translates Domain Names into IP addresses. This is required as computers understand the numerical IP addresses easily and convert them into websites. At times while surfing the internet you might face connectivity issues. You may see a DNS server error due to which you are not able to load the websites or browse the internet. Moreover, using your ISPs default DNS server might not allow you to view blocked sites. So, to avoid such issues you can change DNS settings on Android.
Here we bring you the solutions which will allow you to customize or change the DNS settings on your Android devices as required. These methods will allow you to change the DNS server by inputting the desired or the target servers IP addresses. Without further wait, let’s get to the steps.
Contents
Method 1: Change DNS Settings On Your Android Devices
I have used the steps and screenshots from my Samsung Galaxy S8 running on Android Oreo. But the method is still the same, just a few steps like selecting the Wi-Fi setting and Advance network menu might differ.
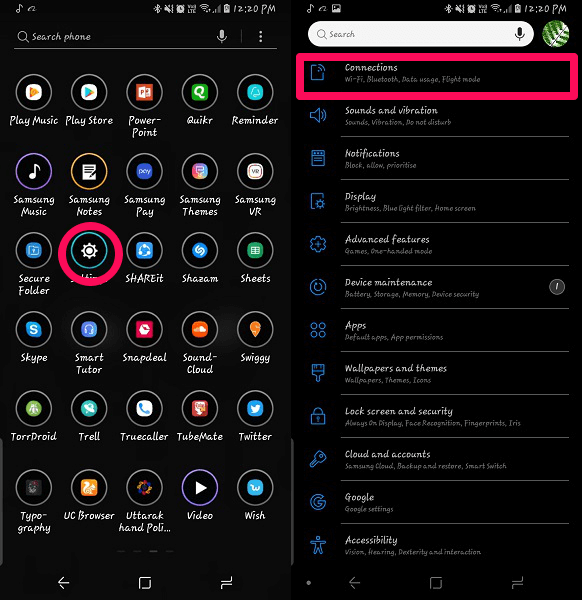
Step 1
From the home screen of your device, go to Settings. There are tons of ways to go to your phone settings.
In settings navigate to Connections > Wi-Fi. Or you can access the Wi-Fi setting by long-pressing the Wi-Fi icon on the notification bar(may or may not work on all devices).
Step 2
Once in the Wi-Fi setting, long-press the network which is connected or for which you want to change the DNS. After this, you will see a pop-up menu. In some devices, you will not be able to long-press or see the pop-menu, you can just tap on the network instead.
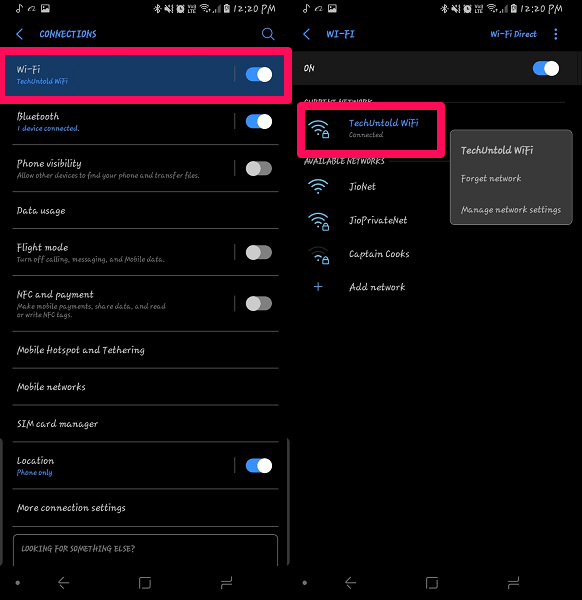
Step 3
Select Manage networks setting in the pop-up menu. In other devices, once you tap on the network you will be able to see the further setting.

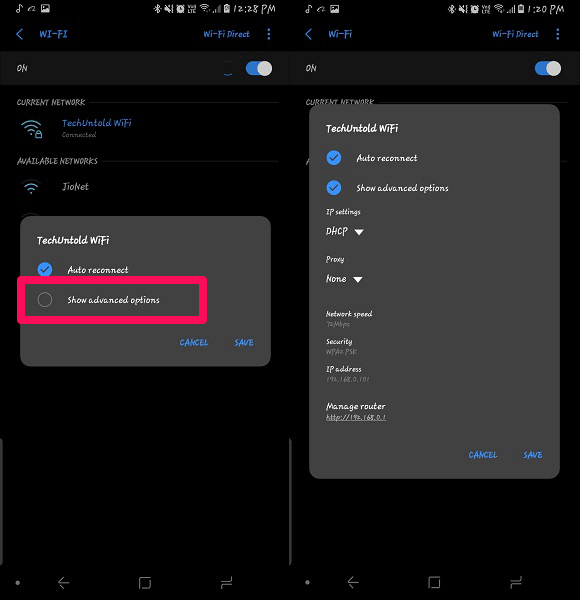
Step 4
After selecting the Manage networks, another pop-up menu will appear. Here you have to select Show Advanced Options.
Step 5
Inside the Advanced menu, you have to tap on the IP settings and change it from DHCP to Static.
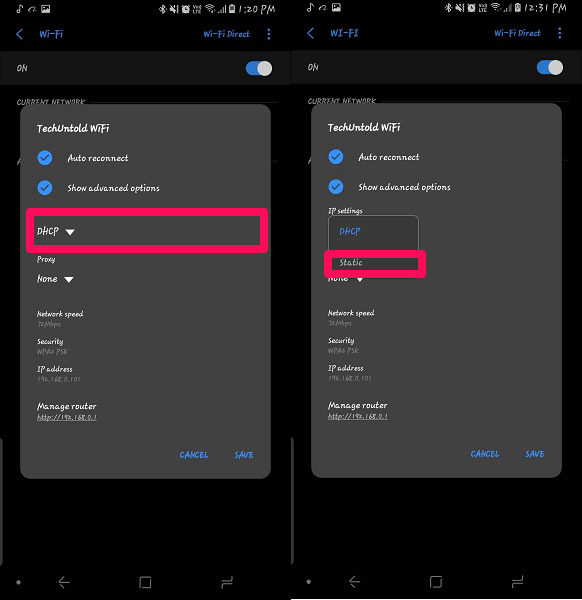
Step 6
After this, you will see the option to manually change DNS 1 and DNS 2 as desired and save the settings.
After you save the settings, the network will reset itself by disconnecting and connecting from the device. Similarly, you can change DNS for other networks if required.
Also Read: How To Apply Bokeh Effect In Android And iPhone
Method 2: Change DNS Server Using App
Apart from the method of changing the DNS directly from the device, there are also apps available to do the same. Though there are several apps on the Play Store, some of them may not work properly or you would require to root your devices. DNS Changer for Android is one app that works perfectly without any of the mentioned issues and the best thing without any advertisements. To do so it uses VPN networks and allows you to change the DNS settings as required for browsing the internet.
DNS Changer app is available for free on the Play Store.
Once the app is installed and you open it, you will see the dashboard where you can enter two DNS addresses. Once you have inputted your desired DNS settings, you can then tap on Start.
After that, the DNS will become active and you can see its status in the notification panel. To stop this connection you can tap on Stop and it will become inactive. It will also show how long the DNS addresses are connected. If you want, you can make any of the inputted DNS as your default DNS address.

Other than the option of changing the DNS for any desired networks, this app has a little more to offer. It will show you the current networks DNS servers that you can use and let you look Up for other websites and their DNS. It also has a button to disable all the functionality of this app which can be enabled anytime or once the device is rebooted.

Final Say
These methods will let you change the DNS settings on an Android device as per your requirements when needed. The best way is to do it from the Android device itself, but if you want to have more customization and keep track of your DNS changing activities then the DNS changer app is the best option.