In many instances, you might have run into a situation when despite being connected to your WiFi network, you still couldn’t access the internet. The problem could be associated either with your device or your wireless router. First, determine whether or not your device has a problem by connecting other devices to the same network. If the same things happen with other devices too then you can rule out that your WiFi needs to be fixed. In this article, we are going to tell you some quick and easy fixes for your wireless internet connection issue.
There could be many problems and solutions related to no internet access and we are going to mention as many as we could. Before we jump into other methods of fixing this issue, you should quickly check if the problem is due to your slow internet speed or not. Sometimes, certain webpages take time to load or even doesn’t open due to slow internet speed. If that is the case, then visit Speedcheck.org or another internet speed test site to know for sure and contact your internet service provider to improve the speed. Here are some other methods by which you could start fixing your WiFi issue on your own.
Contents
- 1 9 Ways To Fix WiFi Connected But No Internet Issue
- 1.1 1. Check Your Router/Modem
- 1.2 2. Check Router Lights
- 1.3 3. Restart Your Router
- 1.4 4. Perform Troubleshooting From Your Computer
- 1.5 5. Flush DNS Cache From Your Computer
- 1.6 6. Check The Proxy Server Settings On Your Computer
- 1.7 7. Change The Wireless Mode On Your Router
- 1.8 8. Update Your Outdated Network Driver
- 1.9 9. Reset Your Router And Network
- 1.10 Conclusion
- 2 About The Author
9 Ways To Fix WiFi Connected But No Internet Issue
1. Check Your Router/Modem
If you can’t access the internet on any your devices connected to the same network, then the issue could be possibly due to your router. In that case, see if your ADSL cable is properly connected to your router. If not then pull it out once from the router and reconnect it. Also, check for any physical damage on the cable and consider buying a new one if it’s broken. We recommend you to go for this cable from C2G/Cables To Go. Similarly, check the wires on the adapter and router as well.
2. Check Router Lights
There is a way you could determine whether or not your internet connection is working at the ISP end. Confirm with the following conditions :
- When you switch on the router, all the lights should be green. Usually, there are 3 lights in the router that should be ON.
- The Internet light should be stable and not flickering.
- The WiFi indicator light should blink at first and then become stable.
If any of these lights don’t work or turn red instead of green and you have checked all the cables. Then the problem is at ISP’s end and you should contact them to confirm and to resolve the issue.
3. Restart Your Router
The first and foremost thing you could do before trying something is restarting your router. It doesn’t sound like much but restarting your router could sometimes fix your internet connection issue. It basically reinitializes your connection to the internet service provider.
To do this you could simply turn off your router and restart it again after a few seconds. If your adapter and router are plugged into a power source then turn off the switch as well. Turn it on and try reconnecting again to see if it changed anything. Additionally, you could also try rebooting your computer or restarting your devices.
4. Perform Troubleshooting From Your Computer
If the above methods don’t fix your internet and you have no idea what is going wrong with your internet connection then follow these steps:
1. On the bottom right corner of your screen, there is a network icon on your task tray. Right click on it to bring up the network options. Then click on Troubleshoot problems.
2. When you do this Windows Network Diagnostics will automatically start detecting the problem with the network.
3. Once it detects the problem it will tell you what the problem is and what you can do to fix it. In some cases, the tool will try to fix it for you or redirect you to the page where you can fix it.
Note: Windows Network Diagnostics tool is available throughout the version of the Windows operating system for detecting network problems.
5. Flush DNS Cache From Your Computer
DNS cache is temporary data stored by your device’s operating system. The data contains a list of recently visited websites and their respective IP addresses. Therefore sometimes that data might get corrupted causing problems while opening a website. So you need to Flush DNS cache in order to ensure if that is causing a problem and here’s how you do it.
1. Press Windows +R key on your computer and type cmd to open the command prompt.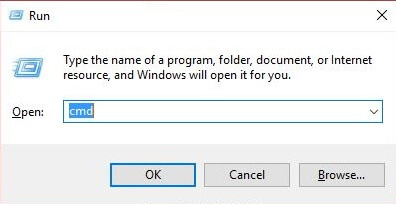
2. Then simply type the command ipconfig /flushdns on the command prompt and press Enter. This will successfully flush the DNS resolver cache.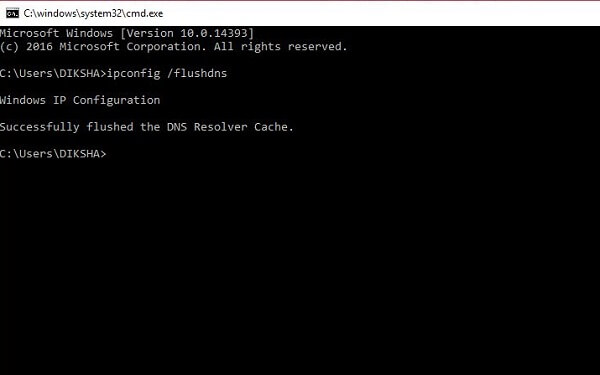
Note: In some cases, you have to close and reopen your internet browser for it to work.
6. Check The Proxy Server Settings On Your Computer
Sometimes when you connect your computer to another network, it picks up a custom proxy server setting from that network. Now if you connect your device to another network, it won’t connect because you are still using manual proxy server settings.
To use automatic configuration for your network just Open Control Panel and click on Internet Options. 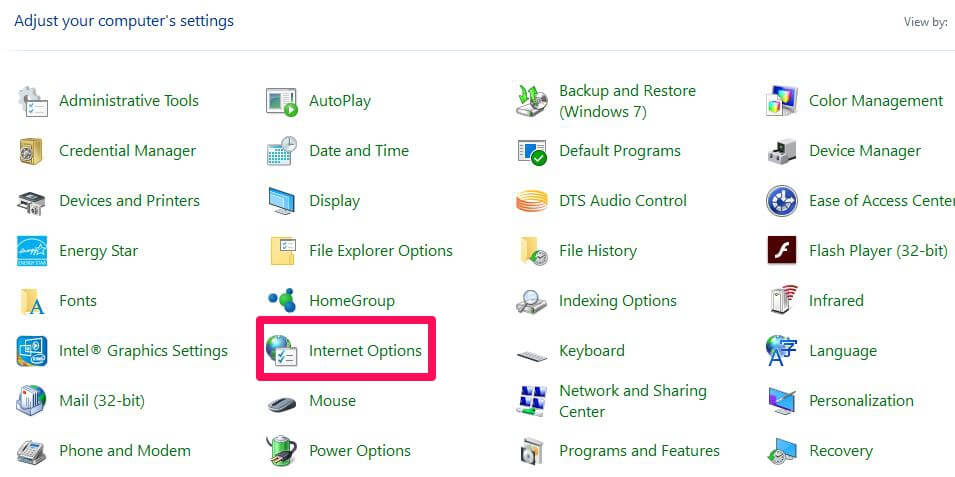
In Internet Properties window, go to Connections tab and click on LAN settings.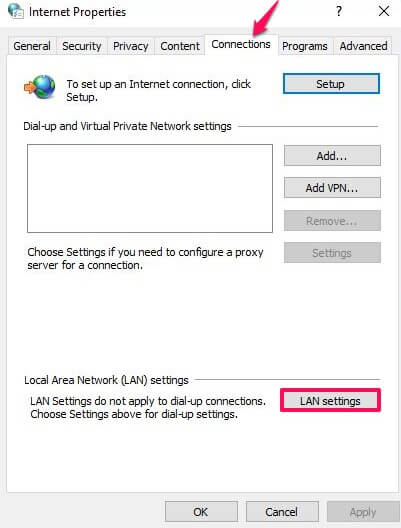
Make sure that everything is unchecked in the Local Area Network (LAN) Settings window and press OK. This way it will automatically override the manual proxy server settings. 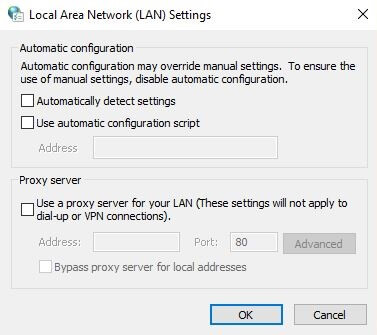
7. Change The Wireless Mode On Your Router
You need to do this if you are getting an internet connection by connecting directly via ethernet cable but not via WiFi. There are certain wireless modes on routers such as 802.11 b, 802.11 g, 802.11n, and 802.11b+g+n. This b, g, and n are different WiFi standards that get updated with time. The 802.11b+g+n is the newest version that covers more area and provides more speed. Now sometimes your device is compatible with the older version while wireless mode on your router is set to 802.11b+g+n. Then it shows network issues while connecting to WiFi. You can fix this by logging in to your router dashboard.
To get to the router dashboard, you need to enter your router’s IP address into the URL box and log in with credentials.
Once that is done, Find Wireless mode under wireless settings. Change the mode to 802.11b and save it.
Now reconnect the WiFi on your device to check if it fixes the issue. Otherwise, try different versions and reconnect to them as well.
8. Update Your Outdated Network Driver
Try resetting and updating your network adapter drivers if the problem still persists. The older network drivers can be corrupted causing the internet error even after connecting to WiFi. To update them you need to follow these steps:
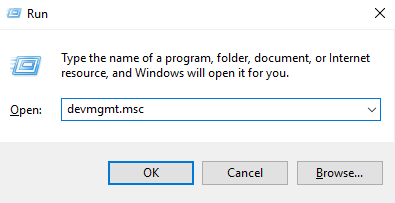
1. Press Window+R keys and enter devmgmt.msc on it to open Device Manager.
2. In Device Manager, navigate to Network adapters and expand it.
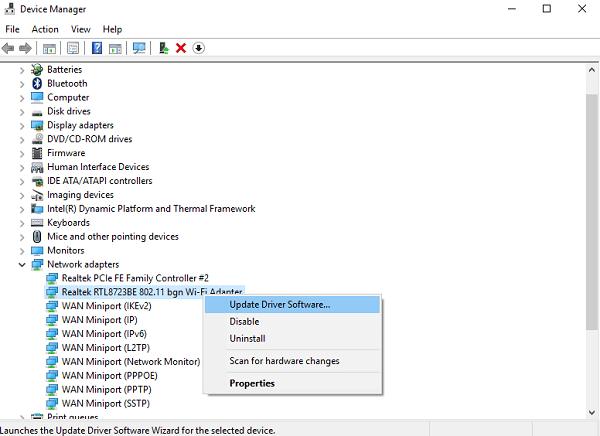
3. Right click on your network and select the Update Driver Software… from the options.
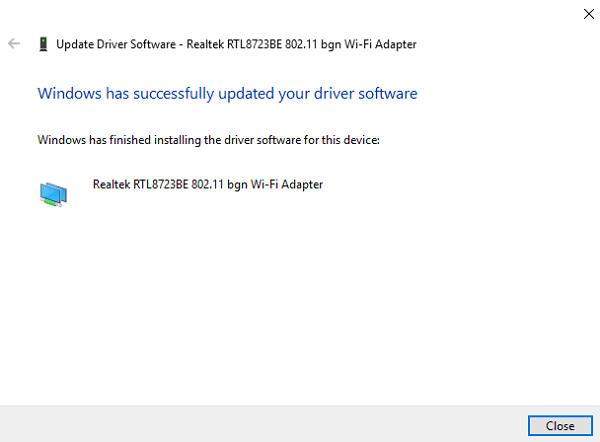
4.Once you have done that you will get two options. Select Search automatically for updated driver software.

5. Now it will automatically download and install the updated driver software for your device and fix the WiFi error.
Note: You need to connect to a different WiFi network or through ethernet cable for this method to work.
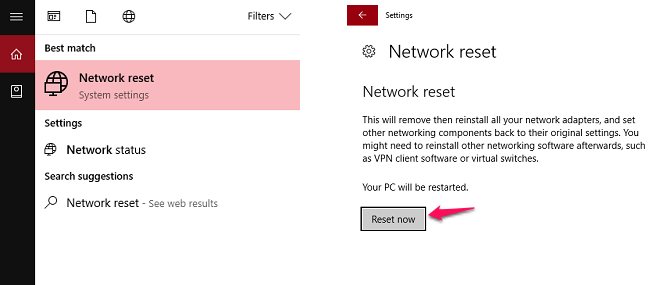
9. Reset Your Router And Network
This should be the last step you should follow to fix your WiFi network. Once you reset your router it will be restored to factory settings and all the new changes will be reset. It will be like the new router without any account or password protection. Same goes for your network all your networking components will back to their original settings. That means Windows will delete and forget all of your stored WiFi credentials, passwords, and VPN connections.
- To reset your router you just need to press the reset button on your router. Usually, it is inside a tiny hidden hole which can only be pressed with a pin or a paper clip. Insert the pin in the hole and press the button till your router restarts and router lights start blinking.
- To reset your network you need to go to Network Reset from the start menu. After that, click on Reset Now button on the new window to reset your network and restart your computer with new settings.
Conclusion
These above solutions will be able to solve most of your WiFi connectivity issues related to software. If one doesn’t solve your issue try another one and so on. But if the problem is with your router’s hardware then you can consider buying a new one (No products found.) or consult an expert to help with that. In the end, it should be your internet service provider’s responsibility to help you with these kinds of issues with your WiFi. We would highly recommend you to contact your ISP if nothing works and the problem still persists. They will be able to fix any WiFi network issue on call or send an expert to fix it for you. Do share these fixes with the friends who might face the same problem. We would also appreciate your comments and take on these methods.
Comments are closed.