No products found., much like YouTube is a platform where you can be a viewer and a creator simultaneously.
You can easily stream on Twitch without any restrictions and start gaining viewers if what you’re offering is worthy. And those same viewers will then start visiting your channel to get to know more about you. So, the question is, what will those viewers see on your channel besides your stream? Will the stream alone be enough to create a good first impression? Well, probably not. You have to make the most out of their visit by giving them something through Twitch panels. Basically, by creating panels, you can provide so much to your viewers, like a direct link to your Instagram or Twitter account. You can even create live polls on Twitch panel. And you can do all that in a decorative and much more appealing way.
But the thing is, if you’re just starting out on Twitch, then you probably don’t know how to create Twitch panels. Well, don’t worry because we’re here to help you out with that. In this article, we’ll guide on everything regarding Twitch panels. So, without waiting any further, let’s get started.
You may also like: How To Delete Twitch Account
Contents
Create Twitch Panels
Basically, you can make two types of panels on Twitch:
Extensions panel: Extensions are like apps that are used to keep the audience engaged. Like you can activate the Suggestion Box extension, which can be used by the viewers to hit you up with any suggestion. And there are a number of extensions like that. Once you activate the extension panel, you can configure it at your own convenience.
Image/text panel: On the other hand, the Image/Text panels are quite basic and are used more often. You can use it if you want to input some images or text in the panel. This type of panel is best used when you want to give a message to the viewers. Also, you can use them to redirect the viewers to someplace like your Instagram account, using a link.
So, if you want to create either of the above panels, then follow the steps given below.
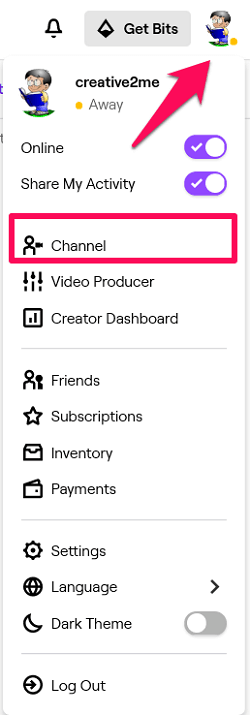
1. First, open your Twitch channel. To do that, click on your avatar on the top right corner of the screen and then select the ‘Channel’ option.
2. Now that you’re on your channel scroll down below your stream screen and you’ll see the ‘Edit Panels’ toggle bar on the extreme left corner. By default, it will be disabled, so all you have to do is enable it.

3. Just after you enable it, you’ll see various extension panels that you can activate. And below the extension list, you’ll see a huge + icon to add a panel. Just click on it. (Note: If in the list, you see an extension you want to add, then just click on Activate to open its configuration and then add it.)
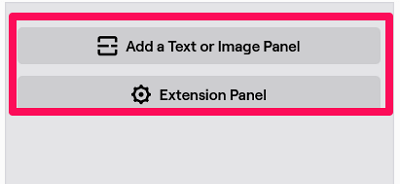
4. Next, select the type of panel you want to add.
Extension Panel
- If you select the Extension Panel, then the panel space will be created for an extension. To add an extension to that space, first, click on the ‘Extension Manager’ option.

- Next, you’ll see a list of all the installed extensions. And to activate one of those extensions, you have to click on ‘Activate’ and assign them the panel space.

(Note: To open the configuration of a particular extension, click on the ‘Settings icon.’ Also, you can delete the installed extensions by clicking on the ‘Delete icon.’)

- If there’s an extension you want to use that hasn’t been installed, then you can install it after finding it in the ‘Discovery’ tab.

Image/Text Panel
- On the other hand, if you want either a text or an image panel, then click on the ‘Add a text or Image panel’ option.

- Then, you’ll have to give a Panel Title. After that, you can add an image and provide a link in the ‘Image Links to:’ bar. This link will help to redirect the people when they click on the image. Like if I want people to get to my Instagram account after clicking the image, then I’ll provide the link for the Instagram account and upload an image accordingly. After doing all this, you can provide a description and then click on Submit. Your panel will now be up and going.
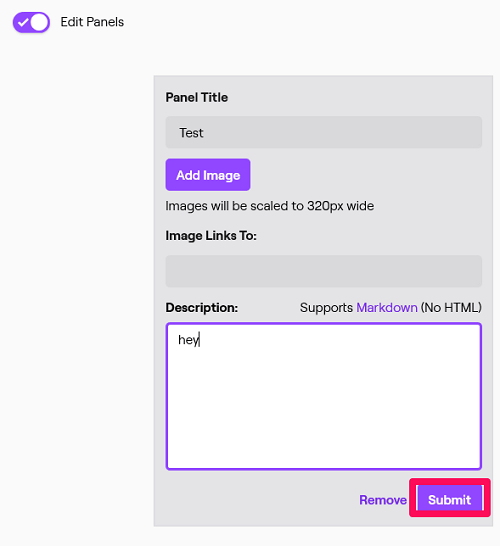
Note: The image you’re trying to upload should not be more than 1 MB in size. Also, the image will automatically be resized to 320*640 pixels. So, it’s better to rescale the picture to that size before uploading it to maintain its quality.
- Finally, to see how your panels are working, you’ll have to turn off the ‘Edit Panels’ toggle bar.
Edite Twitch Panels
Now, it may be that you’ve created some of the panels a while back, and now you want to edit those panels for some reason. Well, to do that, you just have to get back to your channel and turn on the Edit Panels toggle bar. Then, all the previously created panels can be edited in the same way they were created.
Rearrange Panels
While editing the panels, you may realize that you want to change the position of the panels. Thankfully, doing that is pretty easy. All you have to do is drag the panel and drop it at the position where you want it to be. The panel which was originally in that particular position will automatically move just after the new panel.
Delete Panels
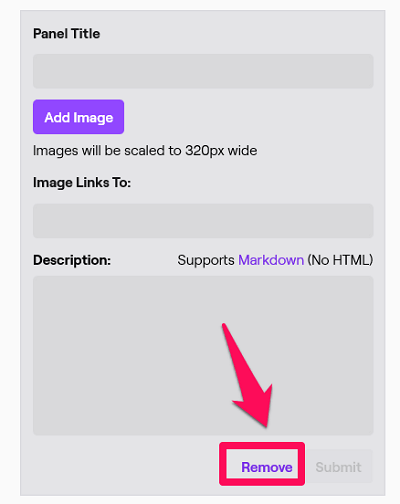
If you’re tired of some of your panels and you just want to get rid of them, then you can always remove them. When on the edit panel screen, you’ll see the ‘Remove’ option below each and every panel. Just click on that option and then confirm your decision by again clicking on ‘Remove.’
You may also like: How To Change Twitch Password If You Forgot It
Wrapping Up
We are sure your Twitch channel looks great after adding different useful panels to it. And the thing is, doing that wasn’t that hard either. Of course, it takes time to make images for Text/Image Twitch panels, but hard work always pays off. Moreover, now you also know how to edit, reposition, or remove Twitch panels. So, without wasting any more time, just get going with it.