The ability to add your gears to Strava is what makes it one of the most sought after fitness app available out there. You can add your fitness gear like your running shoes and bicycle to Strava and track their mileage. You can use the mobile app to track your gears but to add them to Strava you will need to visit their website as the feature is not available on the app as of now. To learn more about adding shoes to Strava, you can read this tutorial.
Recommended: Strava Or Runkeeper? Which One To Use?
Contents
Why Add Your Gears To Strava?
Just like anything else in this world, your gears are not going to last forever and therefore it is important to keep track of them. If you use the same gears, like your running shoes for a long period of time then the risk of injury is always there. Adding gears to Strava enables you to know about their condition and when you should change them.
If you have more than one shoe added to your Strava account then you can compare them and get to know which shoe suited you best. So, that the next time you can invest in shoes that are best for you. Now when you know why it’s important to track your gears let’s go ahead and add them to Strava.
Add Shoes To Strava
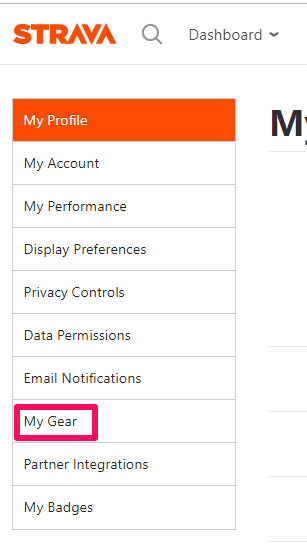
1. Visit the Strava site and log into your account. Then hover the mouse over your profile picture at the upper right corner and select Settings.
2. Now under settings choose the My Gear option from the left-hand side panel.
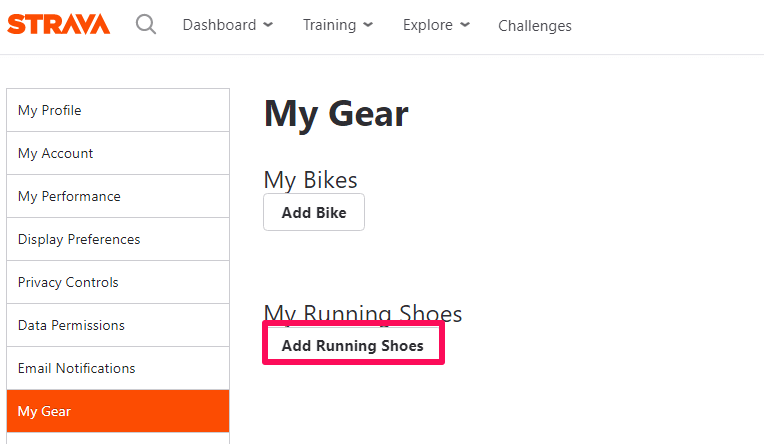
3. Next, click on the Add Running Shoes button to add your shoes.
4. Now first, select your shoe Brand from the list. Then write the Model name followed by the Nickname and Notes.
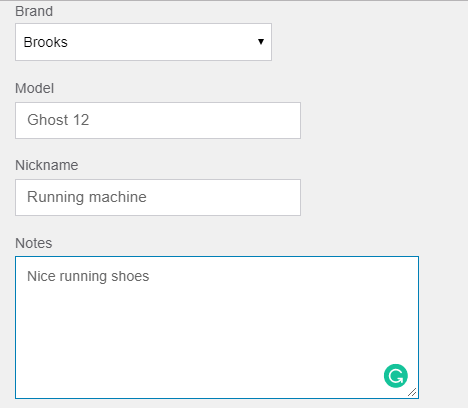
The Nickname section is for personalizing your shoes among others on Strava. Remember that the athlete’s following you can see the nickname you have given to your shoes. In the Notes section, you can give added information about your shoes like its color, condition, size, etc.
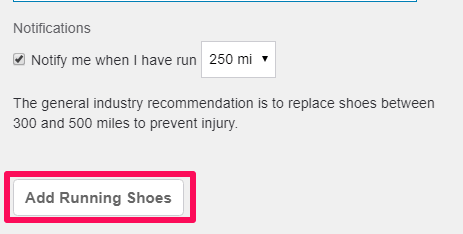
5. Next, check the Notification box below the Notes field and choose the distance at which you would like to get notified. For instance, if you have set the notification at 250 miles then as soon as you complete 250 mi of run with the shoe, Strava will notify you that it’s time to change your gear. Lastly, click on Add Running Shoes to complete the process.
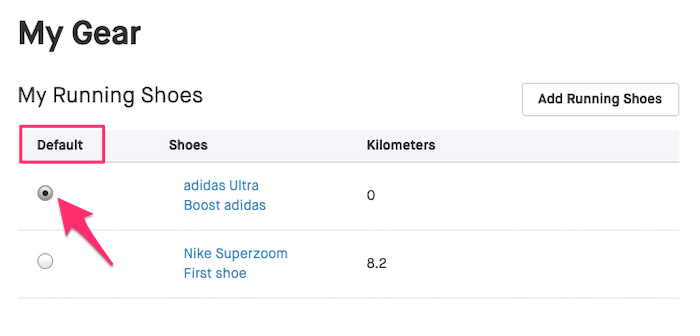
Similarly, you can add more shoes if required. You can also set or change the default shoes to be used for the activity in case of multiple shoes. To do that, select the radio button (as shown in the screenshot below) under Default for the desired shoes.
From now on, when you complete an activity, the distance you’ve covered will be added to your shoe automatically. However, if you’ve added multiple shoes then you can select the shoe which you’ve used for that particular run while saving the activity.
How To Track Shoes On Strava App
Now once you have added your gears on Strava, you can track them on your phone itself. Also, the good thing is that you don’t need a premium membership to track your shoe on the app. So here’s how you can use your phone to track your shoe.
1. Open the Strava app on your smartphone, and go to your profile. On the iPhone, you will see the profile icon at the bottom. If you are using an Android phone then tap on the menu icon on the top left corner and select your name at the top.
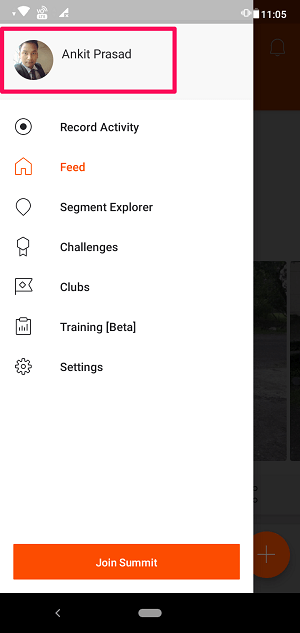
2. Now on your profile screen, scroll down and select Gear.
![]()
3. On the next screen, you will see all your added gears to Strava along with the distance they have covered till now.
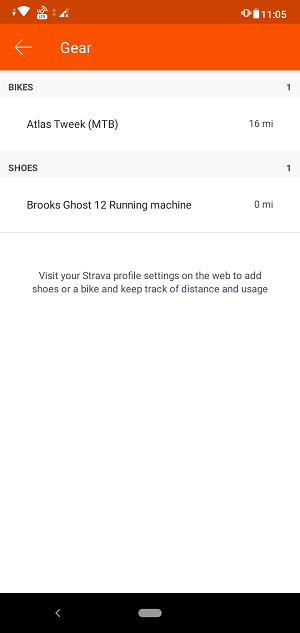
As you can see I have used my bicycle for 16 miles as of now and haven’t used the shoe yet. This way, you can easily track all of your gears and also you will get notified when any of your gears reach their set limit.
Retire Or Delete Your Shoe From Strava
Once you’ve decided to change your running shoes it’s better to delete or at least retire them from Strava. Deleting shoe means, you will completely delete the shoe from your gears list. On the other hand, retiring means the shoe will be seen on your list but won’t be available for any activity. However, you can unretire it later if you want.
To delete or retire any shoe from your list, navigate to Settings > My Gear section on the Strava site. Then hover the mouse over the shoe name. As you do that, the Retire and Delete options will show up.
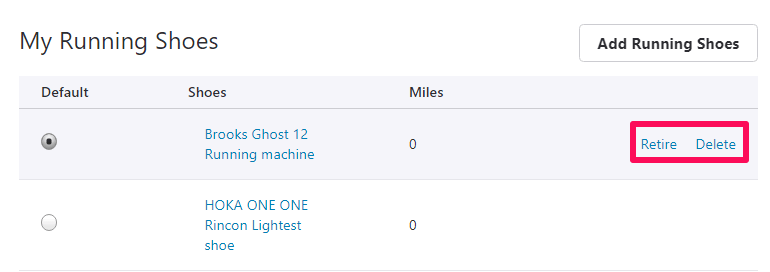
Now just select either of the options as per your choice.
Recommended: How To Create A Segment On Strava
Conclusion
Tracking your gears is a good practice in order to keep you safe from any injuries. With this tutorial, you can easily add and track your shoes on Strava. Also, once your shoes get worn out, you can simply delete or retire them and use new running shoes.