Discord is a popular communication platform among gamers, which enhances the gaming experience by providing a connection between multiple people. It lets you create new servers for your teammates and you can also join the existing servers to be a part of that community. However, even without creating or joining a server, you can still add up to 9 friends to communicate with them via text, voice or video.
But other than just communicating through text, voice or video, you can also share your live laptop/PC/Mac screen with your friends. You can do that by using the Screen Share feature on Discord. This feature isn’t available on Discord mobile apps for Android and iOS, so you don’t any choice other than using the screen recorder apps to share your mobile screen. But it is really good to have it on your PC, especially if you want to guide someone through the steps to do something on their system.
And that is why we came up with this article to show you how to share screen on Discord, with the Desktop app and as well as from the Web Browser. So without wasting any more time, let’s get this show on the road.
Suggested Read: 10 Best Discord Bots
Contents
Using the Screen Share feature is really easy both on the Desktop app and on the web browser. You just need to follow these steps to do the same.
(Note: We’ve included the steps to share screen on Windows PC, but the steps to do so are similar on both PC and macOS. So, you can follow these same steps for getting it to work on your Mac.)
Using The Desktop App
1. Install Discord app on your PC or Mac if you haven’t already. And then Log into your Discord Account.
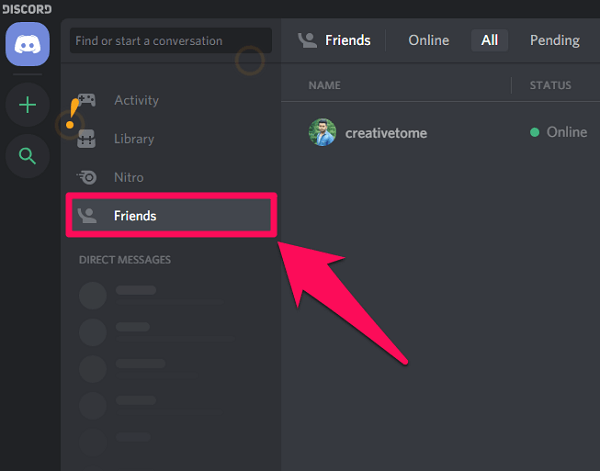
2. After you’re logged in to your Discord account, click on the “Friends” tab to see your list of Friends.
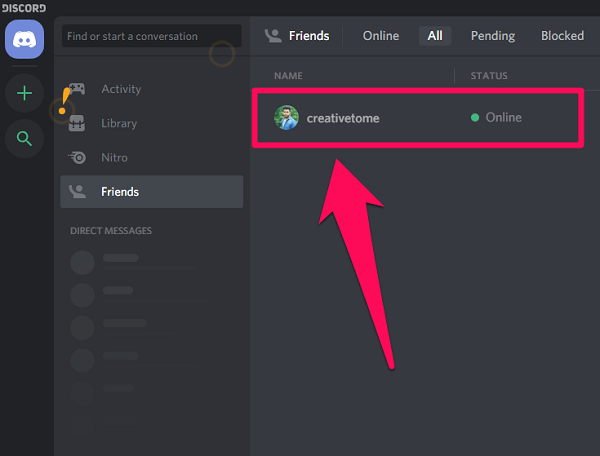
3. Now, select a friend with whom you want to share the screen.
4. As soon as you get to your friends’ direct message history, you’ll see a call icon on the left side of the video icon. Click on it.
![]()
5. Now that you’re on the call, click on the “Monitor” or the “Screen Share Icon” which is to the left of the video icon.
![]()
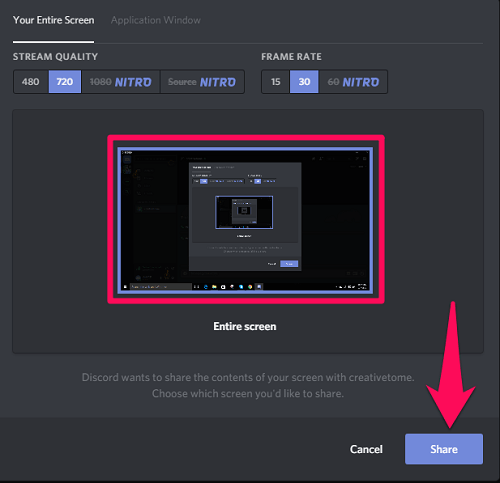
6. A new pop up window will appear and you’ll automatically be on the “Your Entire Screen” tab. Just click on the Entire screen and click “Share.” (You can also choose Stream Quality and Frame Rate of the shared screen. However, the stream quality of 1080P and the Frame Rate of 60fps are only available in Nitro version.)
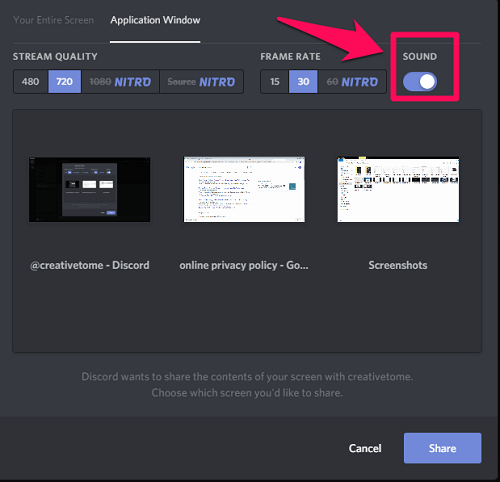
7. From the same Window, you can also go to “Applications Window” tab to share the content of a particular open window and not the entire screen.

(Note: When on the Application Window, you can also Turn On/Off the audio of the Shared Screen by using the Sound Toggle Bar. Also, note that this feature is only available in Desktop app for the Windows and not for the macOS.)
Enable Screen Sharing Using The Web Browser
The steps for sharing screen from Discord website are similar to the steps for the Desktop app. However, you do need to give the “Microphone” access to Discord on the web to enable the Screen Share feature. You just need to follow these simple steps to do so.
1. Log into your Discord account on the web and you’ll directly reach your Home page.
2. Now, you’ll see a microphone icon on the right side of your Discord Tag. Click on it.
![]()
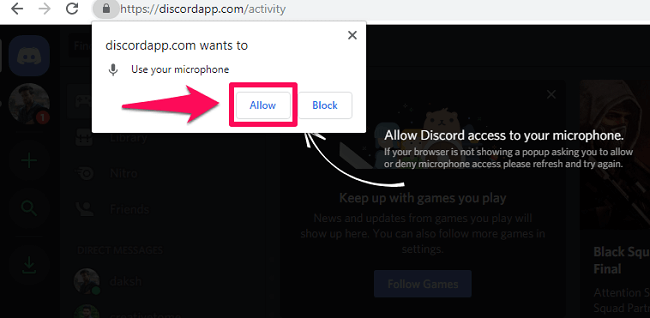
3. As a result, a pop-up will appear on the left corner of the screen asking you for permission to access the Microphone. Click on “Allow.”
(Note: You can also find the microphone icon on the left side of the settings icon when you’re on a call with your friends)

That’s it, now you are set to share your screen with your friends.
Conclusion
Sharing screen is an amazing feature by Discord. One can easily share the activities going on the screen with their fellow gamers using this feature. And the amazing thing is that you don’t require any external software to share the screen, as it is completely free to use in Discord Desktop app itself. The plus point for the Windows users is that they can also share the audio while sharing a single screen. However, the Mac users will just have to wait to get the sharing audio feature within Discord application.
Comments are closed.