Strava is used by millions of worldwide athletes to track and record their activities.
We can showcase or share our activity through pictures along with the distance covered by us. But sometimes, it happens that we unintentionally add unwanted distance to our activities.
This happens when we let the Strava app run in the background even after finishing the activity. But no need to worry as anyone can do that kind of mistake. And thankfully, Strava gives you the authority to edit or change the distance manually. So it is easier for you to keep a record of your activities more precisely.
Contents
Edit Activity On Strava
There are basically two options available on Strava that you can use to edit or change the distance. The options are Crop and Split.
If you use the crop option, then you can just edit the start and endpoint of the activity to make your recorded distance more accurate. On the other hand, the Split option can be used to divide an activity into 2 or 3 parts so that you can edit them individually.
Cropping Distance In Strava
If you’ve messed up the start or endpoint of your activity while recording it, then you can make use of the Strava Cropping feature.
Note: This feature is exclusively available on the Strava Website and can not be used on the Android or iOS app. Although, you can follow these same steps on your phone’s browser.
It will take you about 4 minutes
Follow the below steps to crop activity on the website of Strava.
- Visit Strava on your browser and log in to your account if not done already.
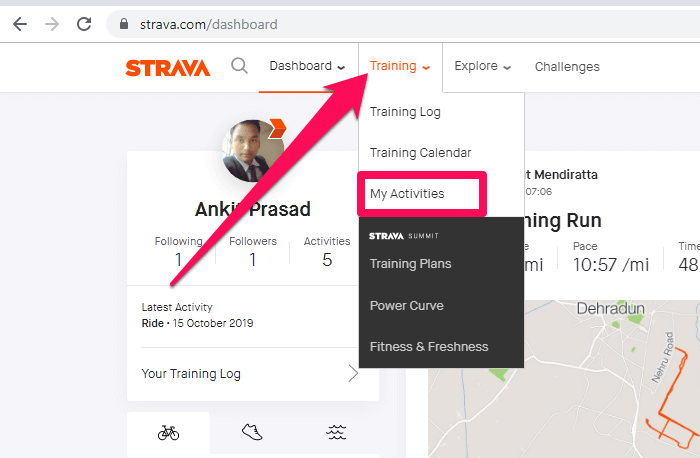
- Next, go to Training > My Activities.
- Now, select the activity you wish to edit. Make sure you click on the name of the activity and not on the Edit option.
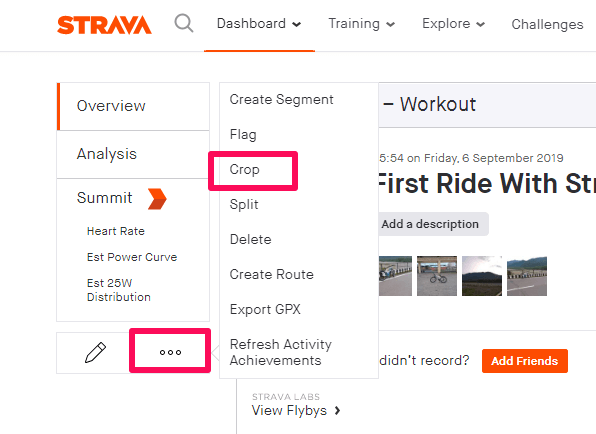
- On the next page, you will see the selected activity. Now, click on the three-dot icon on the left side and select Crop from the options that shows up.
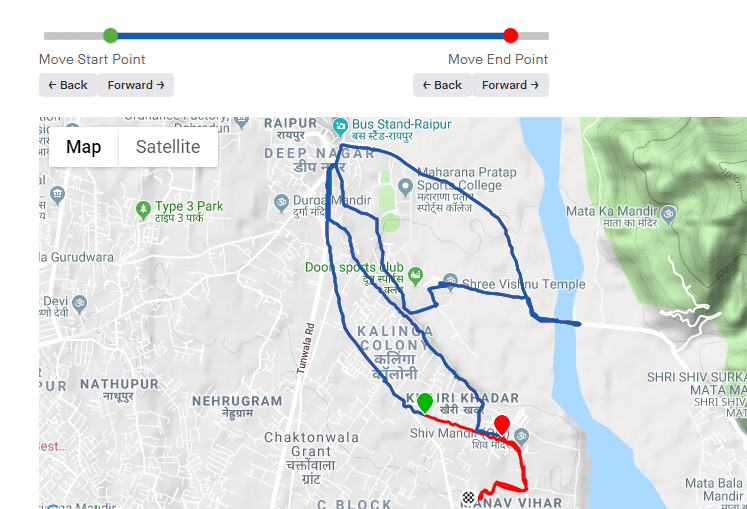
- After that, you will be redirected to the Crop Activity page. If you have ever created segments on Strava, then this page might look familiar to you. Because on this page also, you get a slider bar at the top which you can use to change the starting and the endpoint of your activity.
The starting point is shown by a green dot and the endpoint by a red dot. You can also zoom in and zoom out of the map at your convenience so that you can crop an accurate distance from the activity.
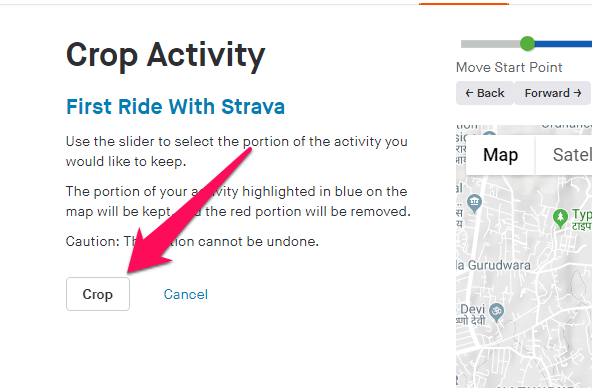
- Once you have trimmed your activity, select the Crop option on the left side of the screen.
Make sure you’re cropping the activity exactly as you want. That is because cropping is an irreversible phenomenon on Strava and it can’t be undone at any cost.
Once the activity is cropped successfully, the time, elevation, and mileage will be changed accordingly. You can see the edited activity under My Activites.
Split Activity On Strava
Using the Crop feature you can only edit or change the starting or endpoint of an activity. And there’s no feature available to edit the middle part of an activity on Strava. However, what you can do is split an activity into 2 or 3 parts. By doing so, you can easily crop or edit the desired part of an activity. To split an activity on Strava you can follow the steps discussed below:-
1. Log into your Strava account and go to Training > My Activites.
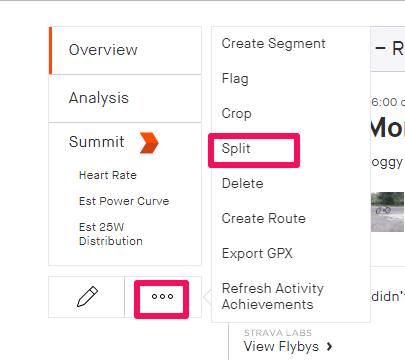
2. Now, select the activity that you want to edit. After that, click on the three-dot icon on the left side and select Split.
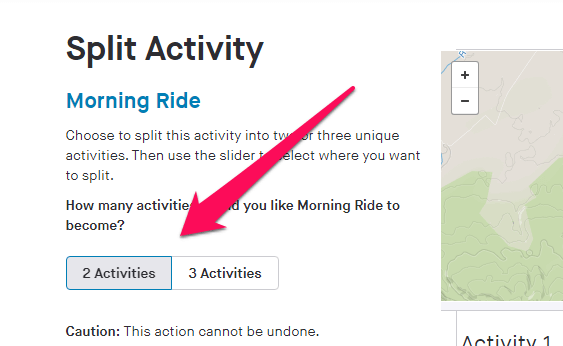
3. On the next page, select the number of activities you want to create out of the original activity; the maximum being 3 parts.
4. Once you have selected the number of activities, you can assign the distance for each activity by adjusting the slider at the bottom of the activity map. After that, select Split to divide the activity. (Note: In case of 3 activities, there will be 2 such sliders.)
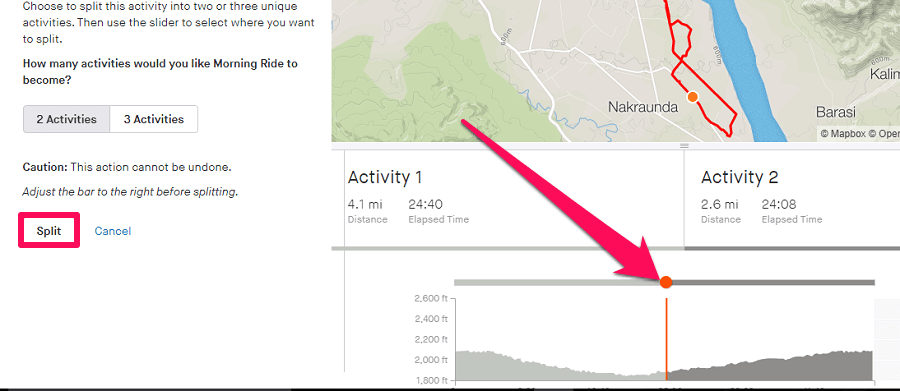
Following that, a confirmation popup will appear. Just click on the Split button to give permission for splitting. (Note: Much like cropping, splitting activity is also irreversible. So, make sure you’re confident about how you’re splitting the original activity.)
5. Once the splitting is done, you will see 2 or 3 different activities, depending upon the number of activities you chose while splitting. The activities will be having the same name as that of the original activity under the My Activity page.
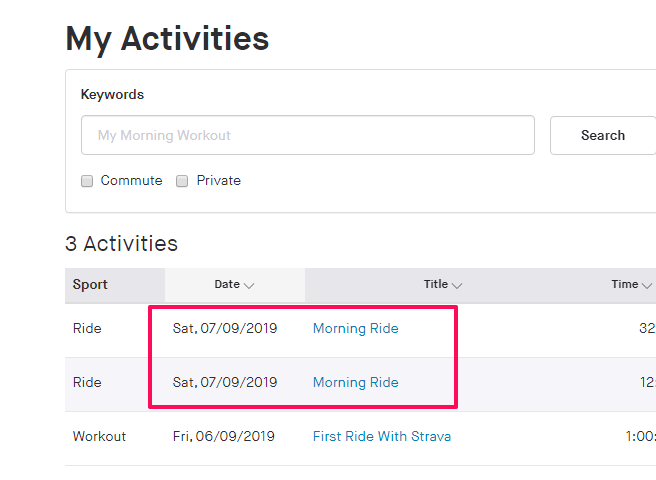
Now, you can easily edit or crop these activities individually and remove the false distance from your Strava account.
Note: All the Kudos and Comments you’ve got on the original activity will stay with the first activity after splitting.
Can You Add Distance In Strava?
It happens sometimes that Strava doesn’t record the whole distance of your activity due to some technical glitches or GPS issues. In that case, you would want to add the lost distance to your already recorded activity. But sadly, you can’t do that. However, you can make a note in the description of the activity about the distance you have lost.
Also, you can create a manual activity by adding the lost distance and the time taken by you to cover that distance. This will help you keep a record of the entire distance covered by you on Strava. If you don’t know how to create a manual activity then here’s how you can:-
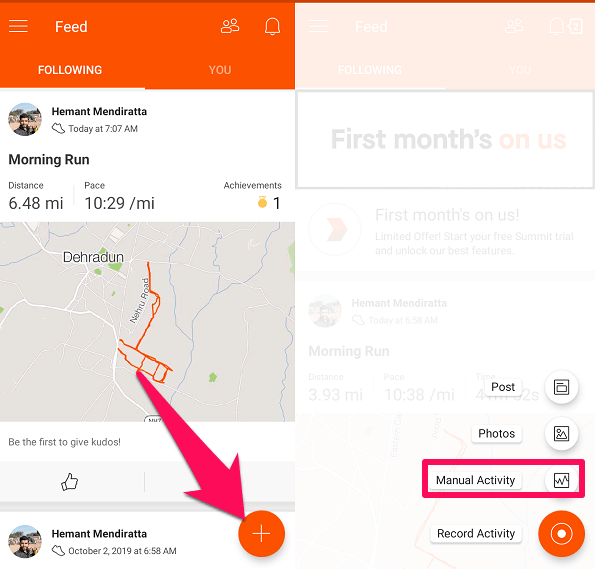
1. Open the Strava app on your mobile and tap on the +(add) icon at the bottom right corner of the screen. Next, select Manual activity from the given options.
2. Now, under the Manual Activity, first, you have to provide a title for it. Then, you have to add time, and distance from the top of the screen. Once you’re done with the details, tap on SAVE at the top right corner.
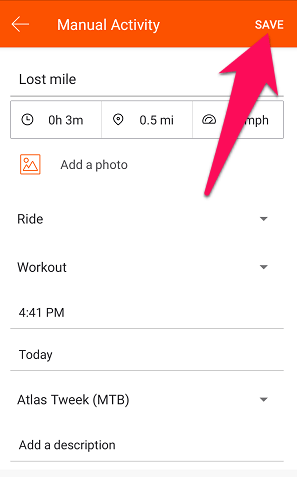
After being saved, this activity will be added to your account. This way, you won’t lose your covered distance on Strava.
Wrapping Up
Strava is a great fitness tracking platform, however, sometimes due to human errors or technical glitches, it can record activities inaccurately. Although, you can edit the distance in your activity and make it more precise. Also, with the little workaround, you can also add the lost distance in Strava so that you don’t lose it.

